This is where Valentine’s Day comes in! For most of society, the day is associated with romance. For me, it simply gives character to a monotonous time of year. Just as twinkle lights illuminate the dark month of December, the bright reds and pinks add a spark of charm to get us through a dull period.
My husband and I rarely do much for Valentine’s Day. Crowds are obnoxious, and dating happens year-round. Sometimes we use it as an excuse to give gifts, but there is no obligation to do so. Throughout the first couple weeks of the month, however, we find little ways to celebrate love as a family. On February 1st, my kids wake up to a heart posted on their bedroom doors with a notes detailing something I love about them. Every morning they find a new heart until they receive a small Valentine’s Day goodie bag waiting for them on the 14th.
What is especially fun this time of year, are the crafts! Who doesn’t have core memories of making popsicle stick picture frames and heart-shaped cards for their parents? Does anyone else get that warm fuzzy feeling when they recall a scene of dripping glue bottles, spilled glitter, and scraps of red, pink, and white paper scattered across a school table?
Remembering it for yourself is one thing. Imagining it as an adult may cause a conniption. What is it they say? Glitter is the herpes of art supplies?
However, mayhem is not necessarily required for arts and crafts with small children. The other day I wanted a creative activity to try, but lately, I’ve struggled to keep up with housework. I didn’t want additional chaos added to my life.
As it turns out, this dilemma is the perfect opportunity for washi tape.
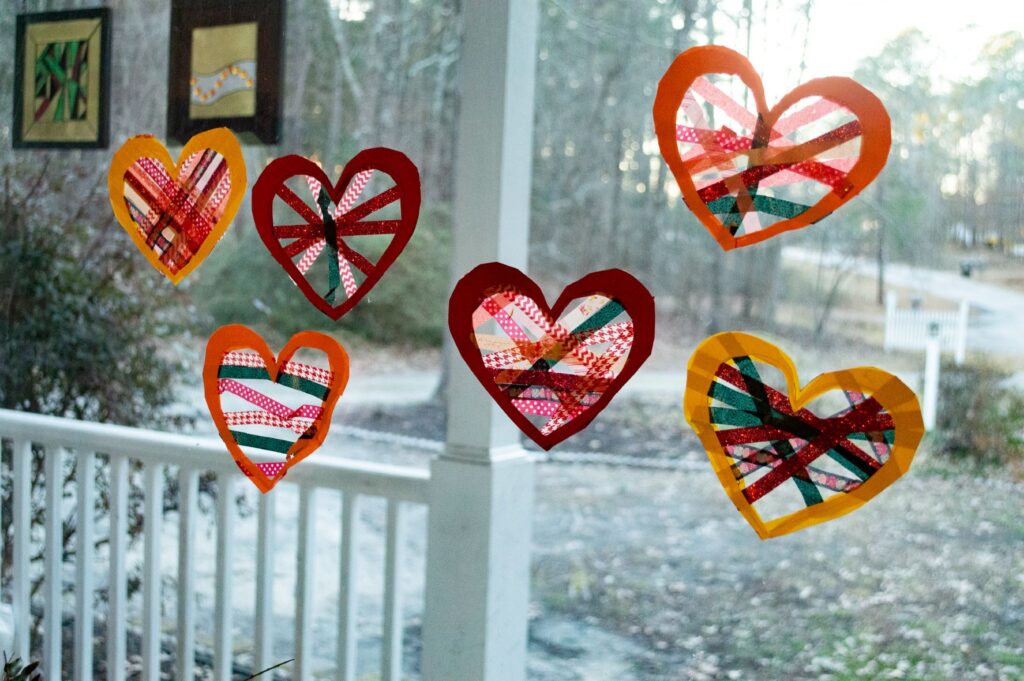
These suncatchers are easy peasy to make and look adorable displayed in windows. Go wild in choosing washi tape designs, and have fun lining different patterns across the hearts. As an added bonus, you can still achieve that traditional Valentine’s Day glitter without leaving your house in a wreck, thanks to sparkly designs currently available at Michaels.
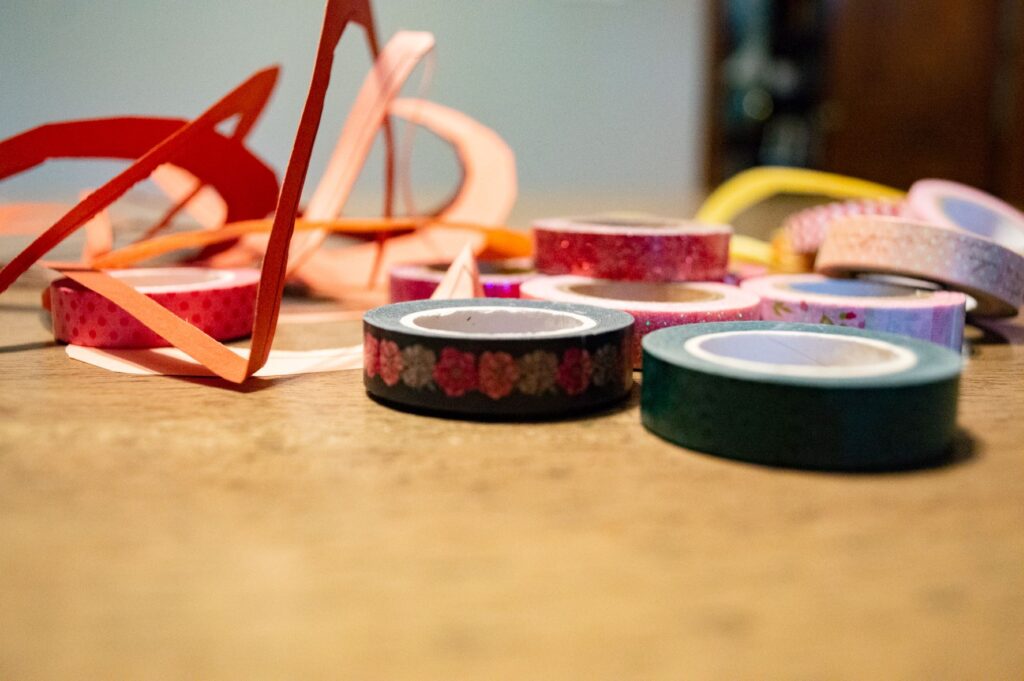
To get started on these beauties, you’ll need to gather a few basic supplies:
Themed washi tape
Glue stick
Scissors
This print out on colorful construction paper or cardstock:
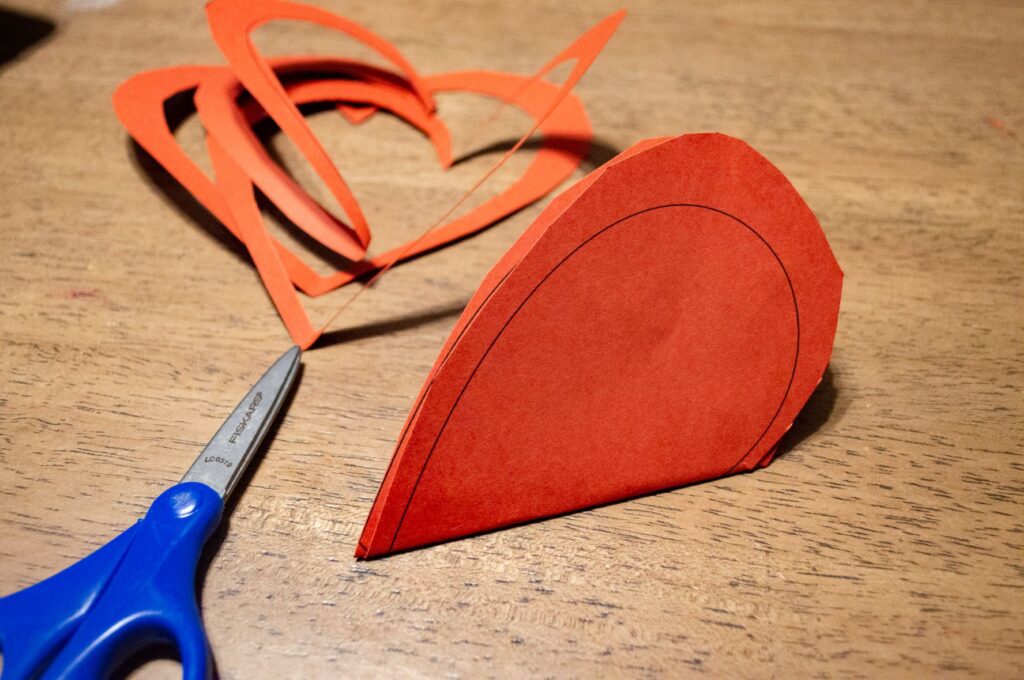
To begin, use your colorful cardstock/construction paper to print out the hearts. Each print will make one suncatcher.

Using the outer lines as your guide, cut out each heart. Next, you will cut out the inner heart. To make this easier, fold your heart in half and follow the inner line just as you would make a normal paper heart.
Next is the fun part! Lay strips of washi tape across one of your heart cutouts. Play with any designs or patterns that inspire you!
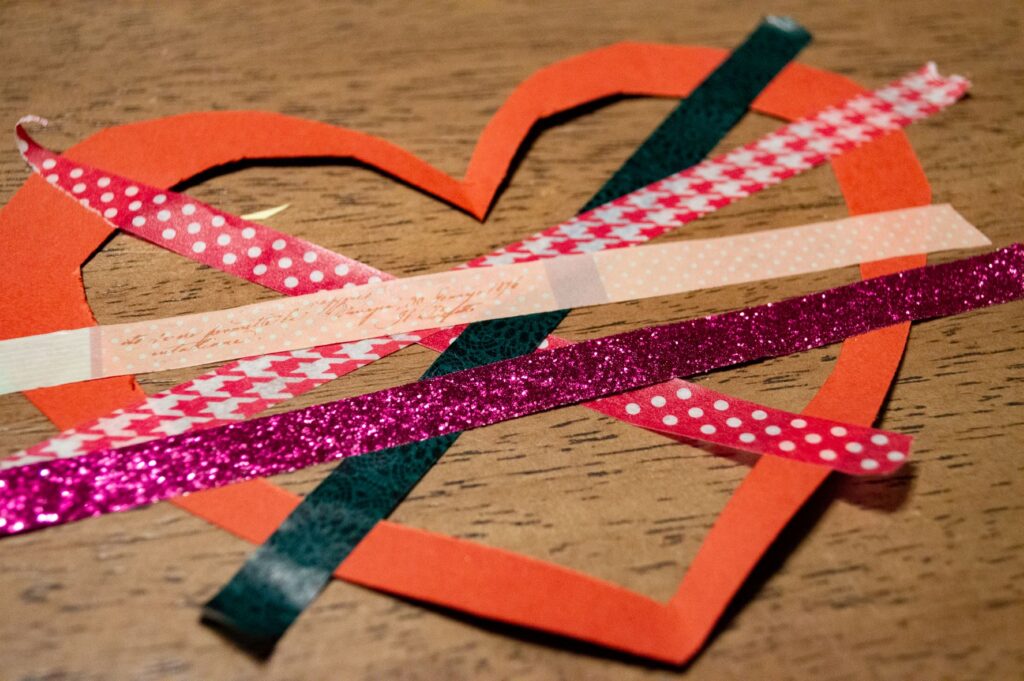
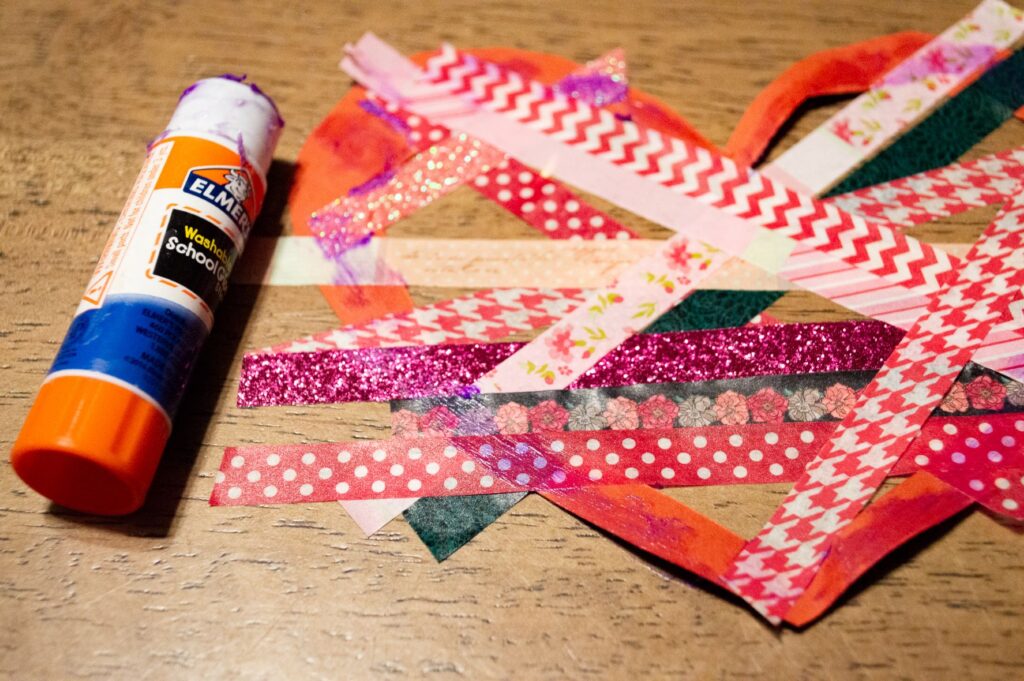
You can cover as little or as much of the heart as you want. When finished, run a glue stick on the surface of the heart (on the non-sticky side of the washi tape). Cover your heart with the second heart cut out. Trim any access washi tape from the edges.
Press the sticky side of the washi tape to your windows, and enjoy these lovely suncatchers!
For those not in the know, epoxy resin is a liquid adhesive that dries into a shiny and clear plastic. The resin typically used in small DIY projects is easily found in craft stores, as well as major retailers such as Walmart and Amazon. While it is necessary to use gloves and take precautions to minimize a mess, the resin is relatively easy to use.
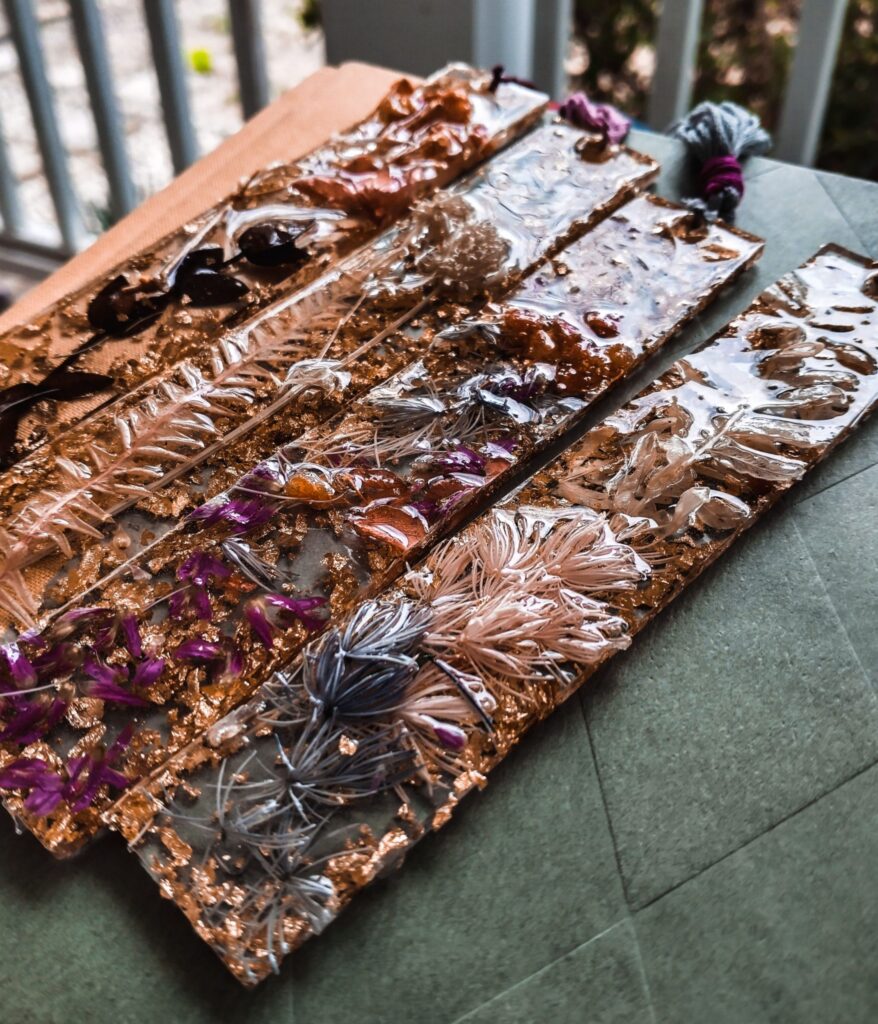
Jewelry is a popular project for resin users, but with the right molds, anything is possible! As much as I adore the stunning necklaces and earrings created with resin, my absolute favorite project so far is bookmarks!
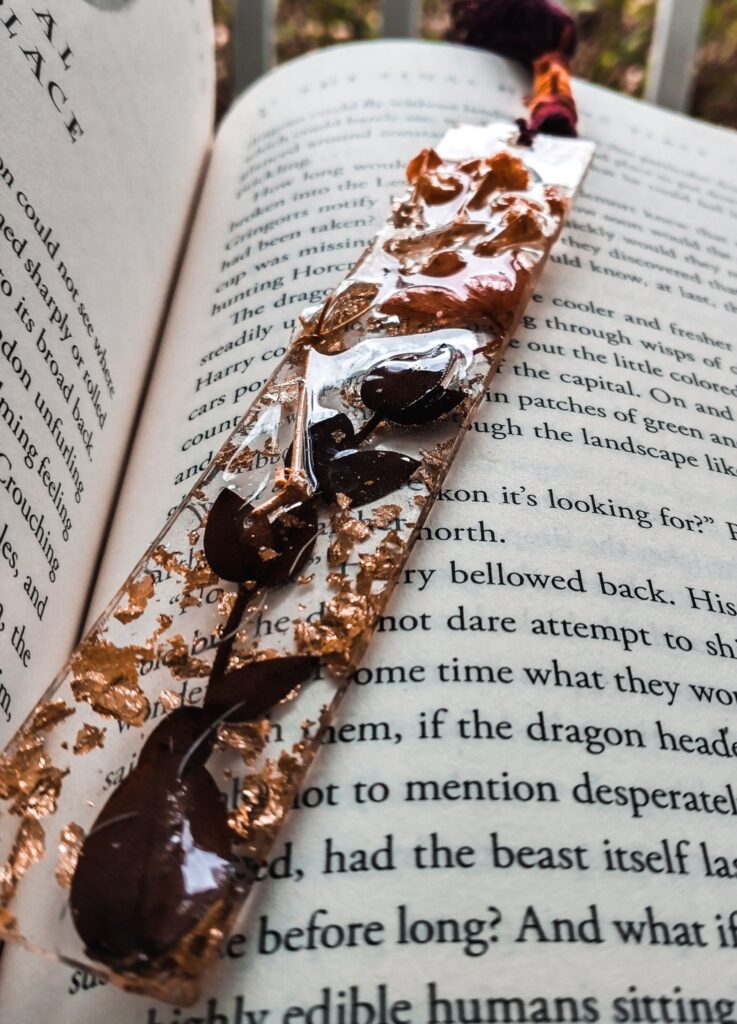
That shouldn’t be a surprise. As an obsessive reader, I love fun and fancy bookmarks! The end result of this project filled me with joy, and I look forward to making more of these in the future. For my next idea, I’ll use specific dyes and embellishments to match the theme of Hogwarts houses (I’m almost finished rereading Harry Potter, so that is currently on my mind). These will also make special gifts for my fellow bookworm friends.
Before working with resin, consider health and safety measures when setting up your space. Work in a well-ventilated area, preferably outside if possible. Wear a mask to avoid breathing in toxic fumes. To avoid skin irritation, wear disposable gloves. If resin does come in contact with your skin, immediately use warm water and soap. If this does not work, vinegar and/or nail polish remover should do the trick.
What you need:
Two mixing cups (these usually come with the kit)
2 or 3 stirring sticks (popsicle sticks work well if your kit did not provide them)
embellishments (dyes, glitter, gold foil, dried flowers, confetti, etc.)
Directions:
To begin, arrange dried flowers, confetti, or any other embellishments inside the bookmark molds.
Glitter, dyes, and gold leaf will be added later.
Next, mix the resin. Prepare to work fast! Use a popsicle stick to mix equal parts of resin and hardener (the two bottles that come in the kit) in one of the mixing cups. To make 4 bookmarks, you only need 1/4 cup of each. Mix for about 2-3 minutes.
Pour the resin mixture into the second mixing cup. Mix for another minute. At this point, you can incorporate glitter/dyes/gold leaf. Mix until well incorporated.
Slowly pour the resin into the molds, filling them no more than halfway. Using a new popsicle stick, carefully spread the resin evenly across the mold. Air bubbles are okay if you prefer the look of them in the finished product, but if you want a smoother style, use the popsicle stick to pop any air bubbles you see.
Set the molds aside in a well-ventilated area. Allow them to sit for 24-48 hours. When dried, pop them out of the molds!
For pazzazz, add tassels to the top of the bookmarks.
Originally posted March 2021
.
While body riding waves is something spectacular, a child’s true enjoyment is in the sand. It keeps them entertained literally all day long, and while I do keep a watchful eye over them as they play, the endless supply of sand offers me an opportunity to take a break from hovering. My daughter was particularly in love with the gritty mess. So much so, she basically bathed in it…
On the other hand, taking my family to the beach doesn’t necessarily mean I check out for the entire time. On top of making sure we pack enough sunscreen, food, and novels, I also like to plan unique activities. This time around, I discovered an awesome craft!
This was an especially easy activity, and even though it may have gotten messy at certain moments, a quick rinse in the sea took care of that hassle.
All You Need Is:
food coloring, zip lock bags, and if you’re wanting to take your craft home, a bottle of some sort, as well as a funnel. I found plastic and glass tubes on sale at Joann Fabrics. I believe they were something along the lines of “glitter mixing tubes”. They were the bare minimum of what I needed for this activity because I wanted to get enough supplies for the adults to participate too (I know my friends pretty well. As expected, they totally made their own). However, if I do this again and I’m looking to do no more than one or two bottles, there were also larger decorative bottles with corks.
Another tool to consider is something thin and pointy to make designs with your sand. A wooden dowel rod
works fine, especially if it has a pointed end. Usually, you can find these in the cake decorating section of Walmart or craft stores.
The activity itself is simple. Fill a ziplock bag with sand, drop food coloring in, and start shaking. If you want to fill bottles, snip the corner of a bag, fit the funnel over the bottle’s mouth, and fill it with your choice of alternating colors until the bottle is packed full. For a really cool effect, stick a rod down the sides of the bottle to make funky designs with the alternating color layers.
On the other hand…this activity does not need to be a craft you take home! If you’re looking for some colorful beach fun that doesn’t come back with you (because let’s be honest, enough sand will follow you home without you trying), simply drop food coloring onto the ground and mix it in with a pile of sand. The result is vibrant beach sand to make unique and creative sandcastles.
This was truly an awesome beginning to our summer season, and I cannot wait to see what other activities we’ll discover in the next couple of months. At the very least, I’m going to pack food coloring for our next beach trip!
Originally published 7/10/2019
]]>I am the quintessential fan that believes Disney World is the best place on Earth. As soon as plans are finalized I set a countdown app on my phone, organize fast-pass schedules, research menu updates, rewatch the classic movies I grew up with (as well as the newer Disney films that have sucked me in as an adult), and poke around Youtube for travel videos that help fuel the anticipation.
Disney World is an escape from real life. As soon as you enter the park, you’re in an entirely different world filled with happiness and magic. Matching t-shirts and funky Mickey ears are not just the oddities of being a tourist – they are a way of life.
This will be our second time visiting Disney World as a family. Unfortunately, our first trip took an interesting turn of events when 3 out of the 4 of us caught a stomach bug. Thankfully we were still able to enjoy every park we intended to visit due to the timing of the symptoms, but we were pushing through some of our days with effort, and it certainly put a damper on the entire trip.
This year is our do-over, and with a new Disney trip comes new Mickey ears!
I wanted to put in more of an effort than last year’s no-sew option required, and skip matching themes in favor of reflecting our individual personalities.
It is the dream of every millennial fan girl to own a pair of rose gold ears, and I can’t say I’m an exception. I struck gold (no pun intended) when I found adorable sequined rose gold material on sale at Joanne’s! That was definitely going to be my pair.
My daughter’s first experience with fandom is happening within the world of Frozen, or as she calls it, “Let It Go“. In fact, we scheduled our fast passes such that the very first thing we do on our very first day at the park is the Frozen Ever After ride. There was just no other choice than to give the girl a Frozen-themed set of mouse ears…complete with a snowflake.
For the boys, I decided hats were the preferred option. It would be more comfortable for my son, and my husband would probably wear a hat anyway if I didn’t give him Mickey ears instead. Being a good sport about my insistence that we go full Disney, I didn’t fancy up his participation more than necessary. He’s getting regular black ears attached to a plain black hat. My son, on the other hand, has a bit more fun of a pattern. There were so many adorable Disney prints to choose from, but in the end, I decided on simple Mickey faces on a red background.
I’m excited to wear these awesome homemade ears. I’m excited about Disney World! I can’t wait to show these off!
What You Need
Fabric (1/4 of a yard is more than plenty)
Foamboard
Pieces of felt
Polyester fiber-fill
Rotary cutter and scissors
Hot glue
Sewing machine and thread
A hat or headband
Any embellishments you would like to decorate with
.
Directions
To begin, outline the shape of the ears on a foam board, one for each ear. Make sure they are the same size. My ears measured a little over three inches both horizontally and vertically. Don’t forget to give the bottom part of the ear an arch.
Cut out the ears. A rotary cutter is going to give you the cleanest cut. Scissors are difficult to maneuver through the hard foam, but it’s not impossible.
It’s okay if the edging isn’t smooth.
Trace your foam cutouts on the felt four times. Cut them out. I didn’t care what color felt I used since my material wasn’t transparent, with the exception of the Frozen-themed ears. Just keep in mind what might show through the material, and pick your felt pieces accordingly.
Hot glue a piece of felt to each side of the foam ears.
Then, hot glue along the top and side edges of the ears and attach pieces of the polyester filling. This will give the ears better form and a cleaner look.
On the back of the fabric, draw four mouse ear shapes. They should be about an inch bigger than the foam pieces. Using a rotary cutter, cut the pieces out.
Pin together two pieces of the ear-shaped fabric, pinning them “right” sides together with the “wrong” sides facing out. Do the same for the other set of fabric earpieces.
Now it is time to sew! Sew along the side, top, and down the other side of each ear, leaving the bottom arch open.
Once removed from the sewing machine, reach into the bottom opening and pull the fabric so that the ears are now right side out.
The foam piece is now ready to be inserted. In order to fit the foam into the fabric, bend it in half. It will feel like the foam might snap, but just keep bending until it folds “hot dog style”.
Push the foam into the fabric, allowing it to unfold once it is covered. Adjust the fabric around the foam so there are no wrinkles.
Rather than trying to maneuver the bottom piece back into the sewing machine so as to close the bottom of the ears, hot glue at this point is secure enough. Simply fold down the access fabric on the bottom of the ears and glue it in place.
To finish, attach the ears using hot glue to a headband or hat. For extra character, add an embellishment. I included a couple of plastic flowers in my rose gold ears, and to really capture the Frozen theme I attached a felt snowflake ornament to the middle of my daughter’s ears.
Originally published 12/23/2018
]]>Last week we wrapped up a year of preschool that took us beyond my expectations. We discovered our world through geography lessons using a literature-based curriculum, and simple letter and number recognition activities eventually turned into reading and basic multiplying. Now that I see what happens when I let my son explore the world at his own speed, I am excited to continue our homeschooling journey!
With the free time we now have at the beginning of summer, I introduced some fun by showing the kids a new slime recipe! The best part is the fact that it comes down to only two ingredients, which made set up incredibly easy even if clean-up was more involved.
All this recipe needs is equal parts liquid starch and white Elmer’s glue.
That’s it! Wanting to make a large batch of it, we used four cups of each.
It started out as a pretty messy business while the glue and starch reacted with one another. It takes a few minutes before you begin feeling confident in the texture, but if you do go at it for a while and don’t feel an improvement, you may need to add a little bit of either glue or starch. If it’s too runny add a little more glue. If it’s too sticky, drop in tiny bits of starch.
To make this activity extra fun we added food coloring for a rainbow effect!
The easiest method for this is to divide the slime into individual plastic bags and add the food coloring. This allows you to knead the color into the slime without dying your hands (and prevents mixing colors together to create an ugly brown effect before you have a chance to enjoy the beauty of multi-colored slime).
Once all of our slimes had some color…it was time to play!
Originally published 6/10/2018
]]>As I planned our Five in a Row curriculum schedule back in May, I figured I would arrange the book Katy and the Big Snow for a random week in January. If I were still living in the Midwest, I could easily assume that any point in the winter would be an appropriate time for a snow-themed week, considering there is almost always a white powder on the ground from December-February. Down here in the south, however, I had to take my chances. The best bet would be sometime in January.
Similar to last year when we read The Snowy Day, it just so happened that on the week we were scheduled to read a snow-themed book, we received our 24-hour snowfall. I was overjoyed about the timing!
I love snow days, especially now that I’m living in an area where snow isn’t common. The way it softens the loud hustle and bustle of everyday life is dreamy, and I’ll admit that I love any excuse to spoil my kids. When snow happens here, it shakes up schedules and brings a different atmosphere to the house. It’s a special occasion of sorts, therefore rules can bend and we concentrate on making our day cozy, memorable, and fun!
After doing school work, we went outside to play in the snow, where we built Hudi’s first real snowman (usually we don’t get snowman-worthy snow, so this was pretty exciting). Naturally, hot chocolate followed after, topped with whipped cream and sprinkles. As a continuation of our Tale of Peter Rabbit week, we dabbled in English cuisine and baked delicious raspberry lemon scones. To finish out the night we had one last treat that is a snow day tradition in our home: snow cream!
The snow was marvelous, but since I didn’t expect it, I had “snow” themed fun all ready for the kids, which didn’t require real snow. This was a fun and relaxed winter-themed sensory activity that captured the attention of both my 4 and 1-year-old. They even played together, which I love to see! Clean up was a bit more of a challenge, but nothing a vacuum couldn’t handle.
And the prep? So easy. All you do is mix together:
3 cups baking soda
1/2 cup conditioner
That’s it! Put it in a container, give the kiddos some toys to scoop and shape with, and there you have it. Hours of fun!
Originally published 1/25/18
]]>