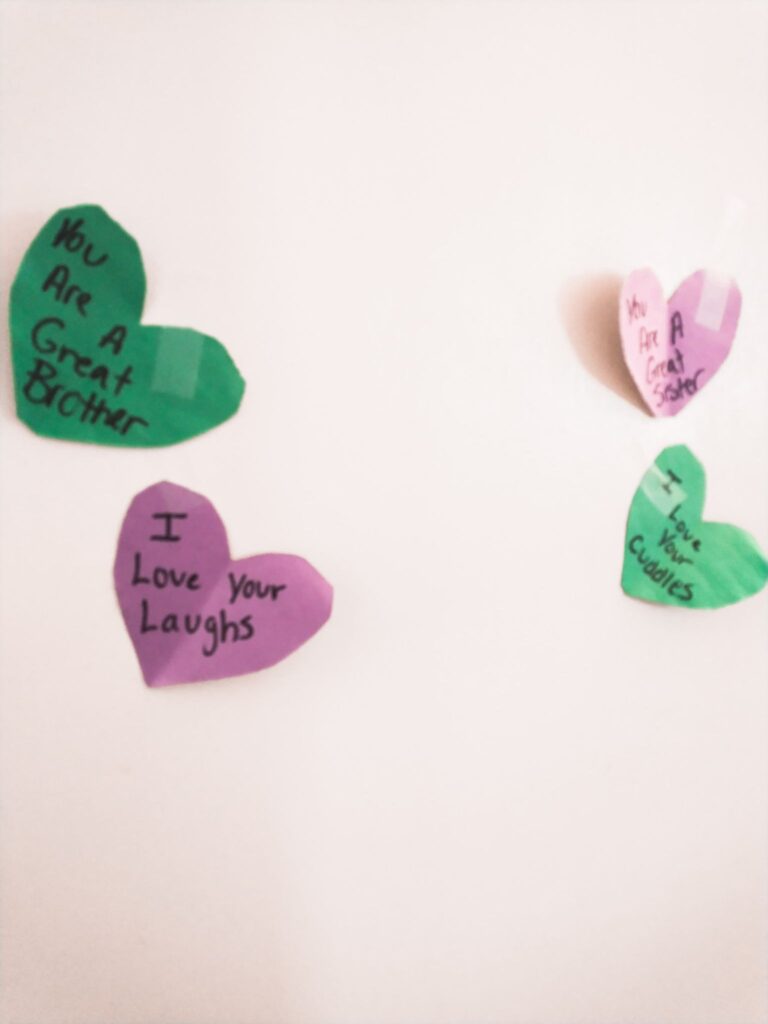
Valentine’s Day is a relatively minor holiday, but it’s one I look forward to every year. February is generally my least favorite month, and Valentine’s Day adds a little happiness to hold us over until the arrival of spring. Not to mention, celebrating love is fun, and now that I have kids I’m particularly eager to make it special. Every year I put little heart-shaped notes on their doors each night for the first two weeks of February. While it’s a simple gesture on my part, the kids love waking up to a new note in the morning, and express great disappointment when I inevitably forget a day. I love how the traditions of Valentine’s Day prove that it’s the simple things we do for one another that have the biggest impact.
But let’s talk about what we really love about Valentine’s Day: Chocolate.
Spare me the diamonds. The cards are nice. Flowers I love. But what I’m really eyeing this time of year is a box of candy. Preferably big ones that I’m not expected to share. I think kids 100% agree with me on this, though I don’t want to dwell on what this says about my level of maturity. So we also make yummy treats to enjoy throughout the month of February. Usually, we’re decorating sugar cookies in the shapes of hearts, X’s&O’s, and flowers. Other times we’re in the kitchen dying different desserts pink, red, and white.
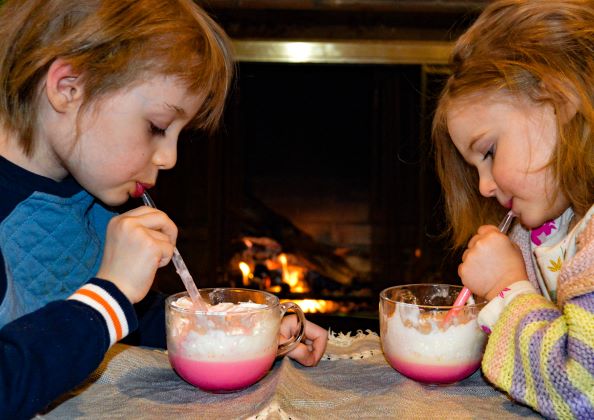
Today we enjoyed a “hot love potion” beside a cozy fire. My daughter went bonkers at the sight of pink hot chocolate, and it amazed my son to discover strawberry milk exists.

White chocolate and strawberry milk may not be everyone’s favorite flavors (especially combined), but this concoction actually turned out pretty well. In fact, I rather enjoyed it!
More importantly, the kids guzzled it down and loved it. This is definitely a recipe for those with a child-like sweet tooth, or grownups looking to impress that special little person in their life.
I mean really. Pink hot chocolate is fascinating.

Hot Love Potion
Ingredients
- 1/2 Cup White chocolate chips
- 1/4 Cup water
- 4 Cups Strawberry milk
- 3 tsp Sugar
- 1 tsp Vanilla extract
- Red food coloring (optional)
- Whipped cream
- Valentine's themed sprinkles
Instructions
- Add chocolate, water, and sugar to a small saucepan. Melt over medium-high heat, stirring consistently until the chocolate is melted and the contents are well combined.
- Add strawberry milk and vanilla to the saucepan. Bring to a boil and remove from heat immediately.
- For a bolder color, stir in food coloring. Pour into mugs, top with whipped cream and sprinkles.
Originally posted February 2021
]]>Vacations are fun, but sometimes our trips have reasons outside of leisure, or we don’t fully intend to disconnect from responsibilities while out of town (digital nomading has been a topic of conversation recently…).
Homeschooling allows us the ability to take education with us. While we’re not necessarily making the kids do schoolwork at Disney World or while on a cruise, I have in the past loaded up our books and dragged them across many states to visit family.
On a regular school day in the comfort of our home, we have a school room organized with supplies and materials we use on both a regular and not-so-regular basis. Everything we need is right there! Taking our school work on the road, however, requires preparation beyond the planning I normally do on Sunday nights. I inventory all our workbooks, I print out any worksheets we may need while away, and I have to pay extra attention to any lessons or activities that might require materials we need to pack. It’s frustrating when I forget common materials after stressing over the packing list!
In the past, I’ve shoved books into tote bags that barely held everything we needed. It was messy, I felt frazzled, and schoolwork took extra long as we sorted through papers and books trying to make do with what we remembered to bring. I’ve worked hard to create an efficient system in our home, and as I look forward to the many adventures ahead of our family I want the same sense of ease while taking our schoolwork elsewhere.
I wanted to make a portable classroom!
The idea is a simple and easy investment. We needed a large sturdy bag to hold our books, and a stash of school supplies packed away specifically for the situations where our homeschooling takes place outside of the house. We keep these supplies in the bag so pre-trip organizing is as simple as grab and go! This works for those long-distance trips across the country (or world!) as well as the occasional excursion down the street to a park when we want to take homeschooling outside for a different change of pace.

It is an incredibly easy setup:
Sewing Machine Bag: Going to homeschool conferences you see many mommas pulling along those
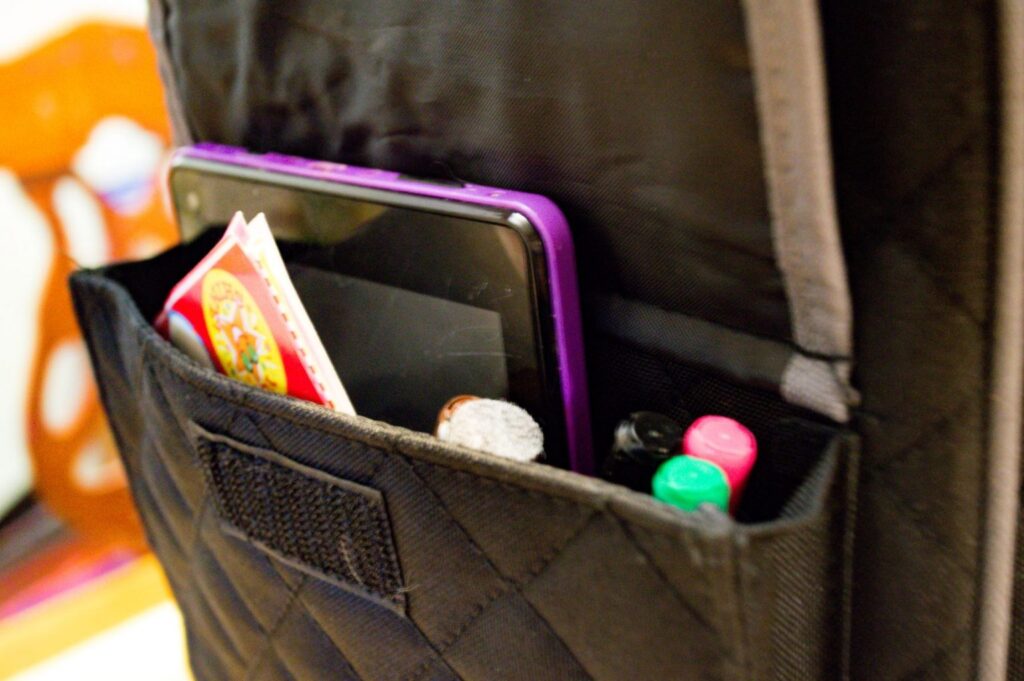
foldable crates on wheels that carry a bunch of books and supplies. I considered those, as well as small suitcases or wheely backpacks. In the end, I decided a sewing machine case worked the best for us. It’s large and sturdy enough to hold sewing supplies, which means it should have no problem carrying my classroom. It has wheels, making it easy to transport, and many pockets for organized efficiency.
White Board: We use the whiteboard a lot. At home, we have a large one hanging on our wall, but for the purpose of travel, we have a small 11X14 inch board that easily fits in the front pocket of our bag.
Dry Erase Markers and eraser
Clip Boards: One for each child. More often than not we have a table open for our workspace. However, that is not always the case so the kiddos each have a clipboard as a surface to write on.
Notebooks: We keep both a primary journal in there to assist with handwriting, as well as a general spiral notebook for extra paper.
Crayons and Colored Pencils
Pencils
Pencil Sharpener
Ruler
Glue Stick
School Scissors
Activities Books: Activity and coloring books are great to hold one child over while I’m working with the other one.
Folder or Large Envelope: At home, my kids have portfolios for some of their work (creative writing for my son, for example). Rather than haul all of those binders along, I keep one large envelope or folder on hand to hold loose sheets of paper that I will sort when we arrive back home.
Pad, Headphones, and Charger: Not only do we use computer programs such as ABC Mouse and digital lessons offered through our curriculums, but I’ve also found that many manipulative materials we play with on a regular basis have free apps. Rather than lugging the box of math blocks along with us, or the letter tiles we use for our reading and spelling programs, I use the digital alternative for when we are not physically in our normal “classroom”. To spare us the headache, I also keep headphones and a charger in there.
Stickers: My kids are highly motivated by stickers. Scented stickers are our favorites! Whatever small reward motivates the kids, keep a small stash in a side pocket.
My portable classroom may not completely eliminate the need for pre-planning. Before heading out I still need to round up the work and textbooks, as well as print any worksheets we will need. However, having a decent bag pre-packed with basic supplies ensures I have the essentials all ready to go when it’s time to head out.
When you homeschool, the world is a classroom. This is my way of making sure I take advantage of that.
Originally posted January 2021
]]>It’s been a nice change! It not only takes some of the responsibility off of me, but it introduces a new dynamic of service by giving him the opportunity to make his sister’s food as well. In fact, The other day he made me a parfait after I exhaustedly flopped onto the couch post-house cleaning. It was such a sweet gesture.
So far these three ideas (along with the fruit taco we made a couple of weeks ago) have been our favorites. If you’re wanting to get your kiddo started in the kitchen, I recommend these simple but delicious snacks.
Pizza Bagel
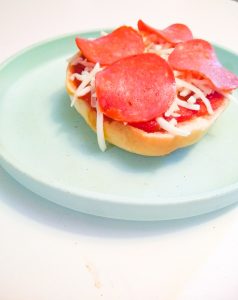
My friend and I used to make these all the time as ravenous teenagers. Now it’s one of my go-to lunch ideas when we’re eating out of the car while road tripping. It’s simple enough for novice cooks, and if your child is ready for it they can even use the toaster to heat the bagel.
All they need to do is spread the pizza sauce (you can buy it in jars or a squeeze bottle), and top it with dried pepperoni, and mozzarella cheese.
Fruit Parfait
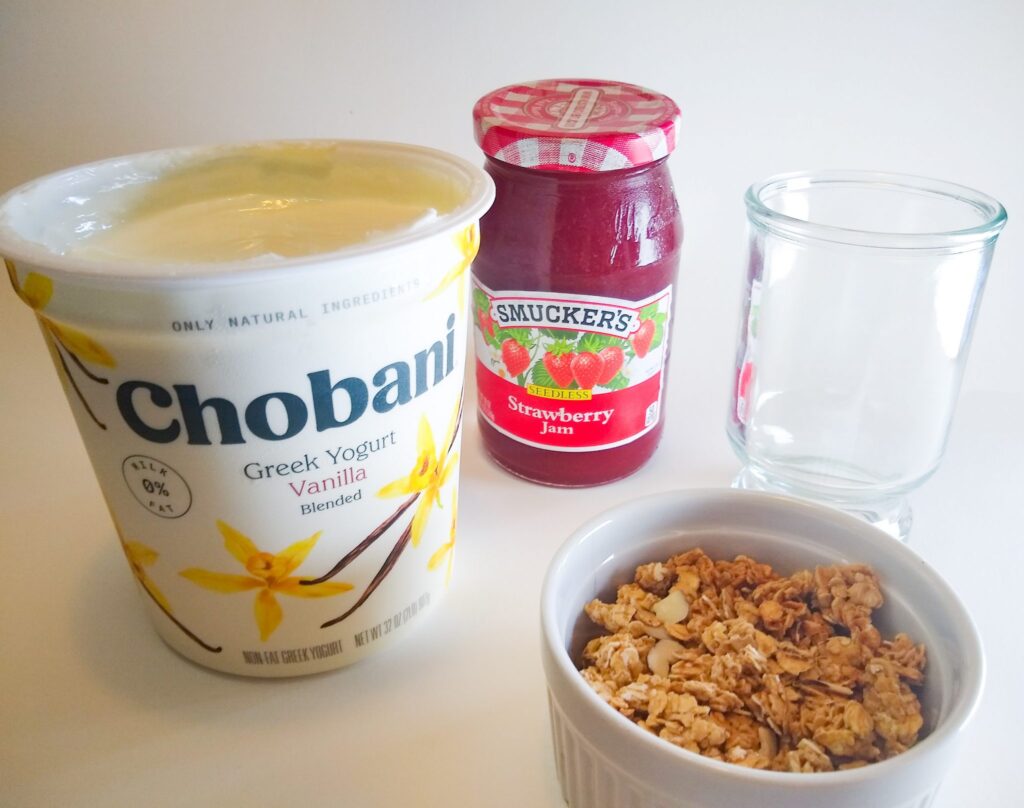
The kids loved this one! It’s a sweet treat, but yogurt is a great source of nutrition. At the bottom of a small glass, bowl, or cup layer a spread of fruit-flavored jam. The important thing when talking your kids through the instructions is to specify a particular amount of jam so as to guide them away from overloading the parfait with sugar (I told my kids to use a tablespoon). Fill the glass with vanilla yogurt, leaving about a quarter of it empty for the granola topping.
It’s delicious!
Apple Pizzas
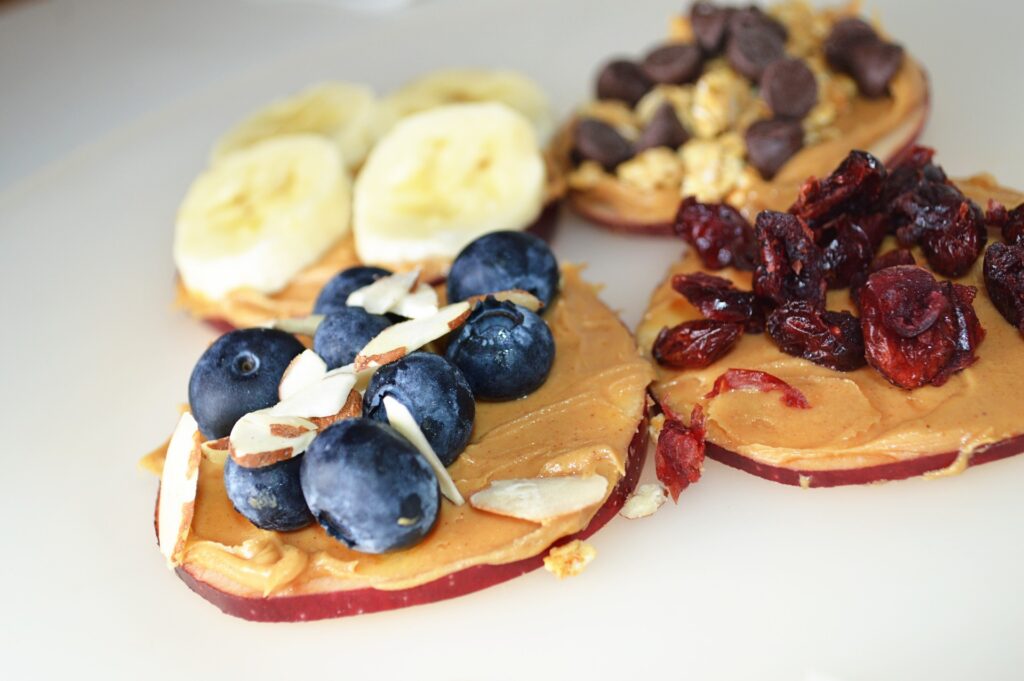
This is another sweet treat, but the variety has endless possibilities! To begin, show the kiddos how to slice up an apple. There are terrific kid-friendly knives out there that are safe for tiny and vulnerable fingers. I found mine through pampered chef, though I believe they’ve since discontinued those particular tools. You can find them in many
other places though! I highly recommend them if you want to get your kids involved in the kitchen.
On each apple slice, choose a spread as the base. We used peanut butter, but yogurt and other flavored butter are excellent choices as well. Sprinkle on embellishments such as fruits, nuts, raisins, and (if it’s a treat) chocolate chips.
Simple. Fun. And definitely yummy!

Originally posted August 2020
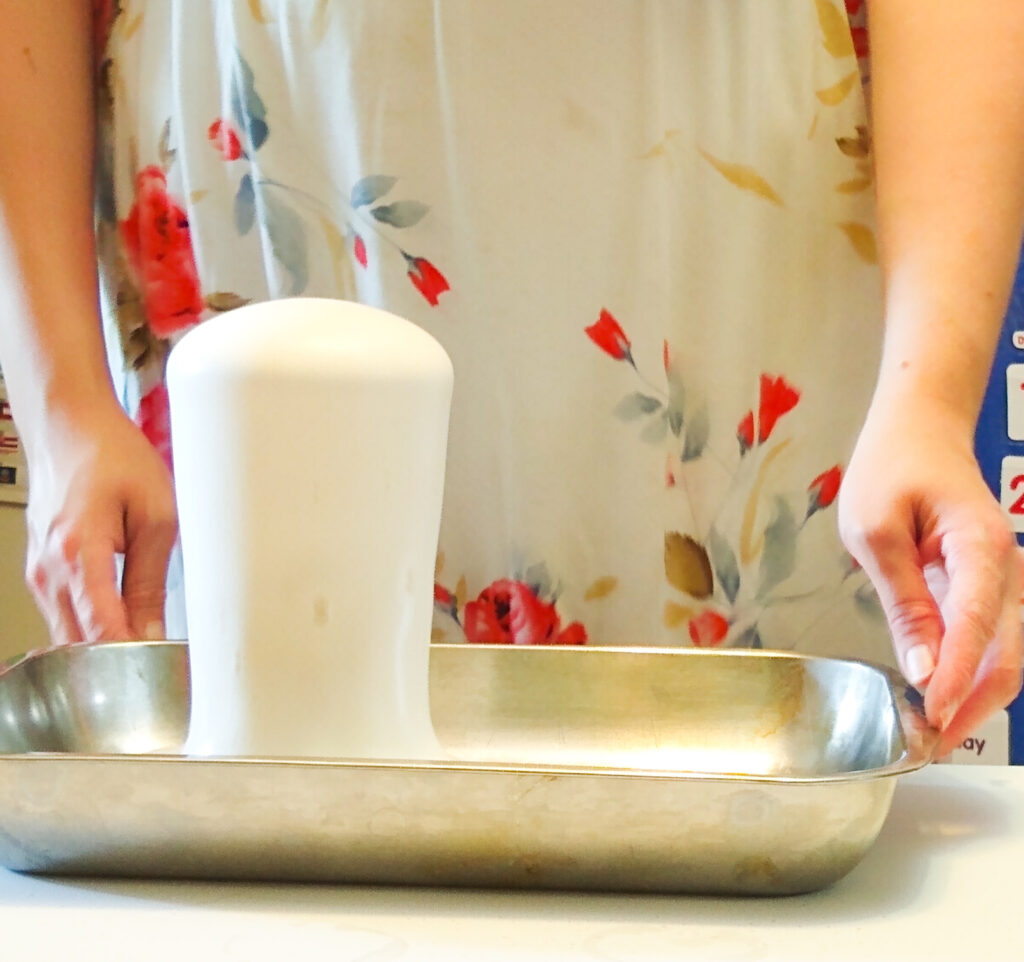
]]>Once we finished our schoolwork for the morning I had to repeat this experiment just so the kids could have time playing in the suds. I gave them cups and spoons, but they definitely preferred using their bare hands. Who wouldn’t!? Admittedly this can get messy, but the good news is that clean-up is easy, especially if you follow my advice and use a sink or deep baking dish.
We took this experiment from the textbook Science in the Ancient World by Berean Builders. If you’re in the market for a homeschool science curriculum, I highly recommend this company. As exemplified by this activity, the experiments are hands-on and require simple household products you either have around the house or can easily pick up at your local store.
For this lesson, our focus was on an ancient scholar named Democritus (c. 460 BC – c. 370 BC), who is credited as one of the earliest scientists to discuss the existence of atoms. We’ve also discussed the various ways scientific theory changes over time as new evidence suggests different explanations. While Democritus helped introduce the world to atoms, not all of his theories were true. In fact, his belief that atoms are indivisible (unable to be broken into smaller parts) lasted about 2,000 years until German scientists split the uranium atom in 1938!
Democritus also believed that the difference between atoms is primarily based on shape. For example, he believed iron atoms have hooks linking them together to make them hard, salt atoms have sharp edges explaining their taste, and water atoms have a smooth surface that makes water slippery. However, we now know this isn’t true. Salt isn’t made out of salt atoms. Water is not made out of water atoms. Iron is not made out of iron atoms.
Instead, most things are made out of molecules, or a combination of atoms and ions joined together. In this experiment, we demonstrate the ability to break apart molecules to produce something different. It’s simple…
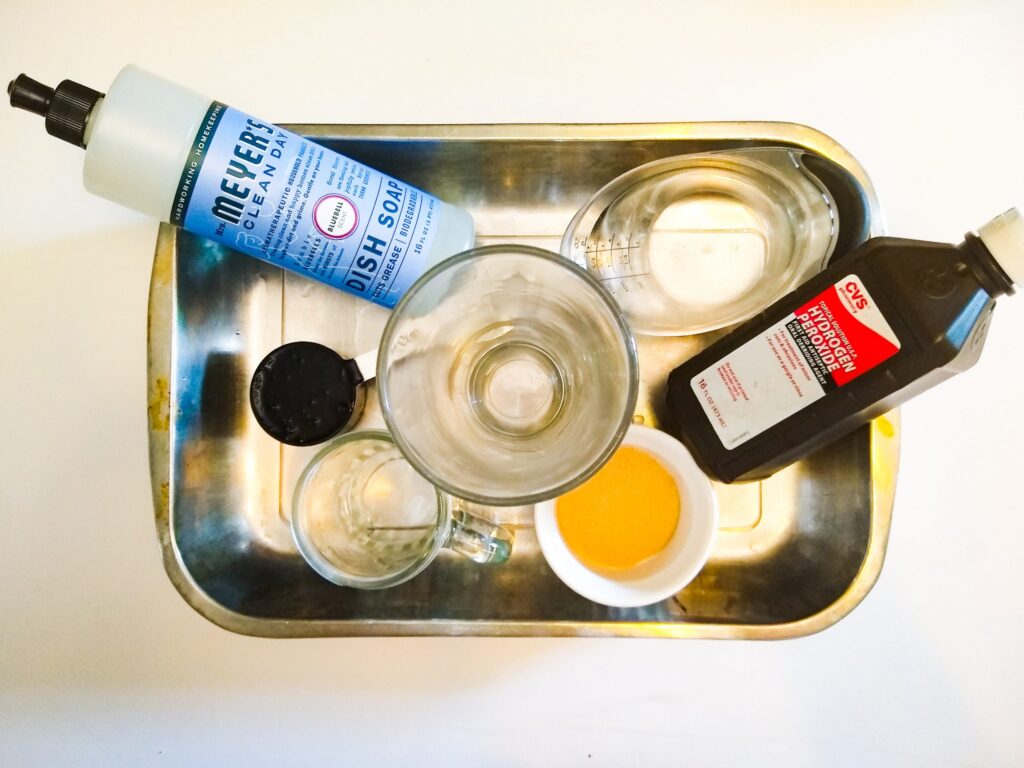
What you need
1 cup hydrogen peroxide
1 TBS active dry yeast
¼ cup dish soap
¼ cup warm tap water
Other equipment:
A tall glass
A small glass
An empty sink or a deep baking dish to control the mess.
Directions
- In a small glass, combine yeast and warm water. Stir with a spoon and let it sit for roughly 2 minutes.
- Pour hydrogen peroxide into the taller class, followed by the dish soap. Swirl the glass so the two liquids mix (do not use the same spoon you used for the water and yeast).
- Place the tall glass in an empty sink or the middle of a deep baking dish. After allowing the yeast mix to sit for a couple of minutes, slowly pour the contents of the small glass into the tall glass containing hydrogen peroxide and dish soap.
Watch what happens…
You just witnessed decomposition! To put it simply, we watched as something broke down into smaller things.
Hydrogen peroxide is made up of molecules containing 2 hydrogen and 2 oxygen atoms. Being an unstable arrangement, the hydrogen molecules try to get rid of the oxygen molecules. This is why we store hydrogen peroxide in closed and dark containers. Light and air speed this process along, which will eventually leave you with…water.
Yeast contains a chemical (catalase) that also accelerates decomposition. So when we mixed the dissolved yeast with the hydrogen peroxide, the hydrogen peroxide molecules released their oxygen atoms. Oxygen, being a gas, escaped into the soap and created the foam we used to visually see this process take place.
Neat huh? The kids certainly thought so. We will revisit this lesson in later years when we’re ready to dive into a deeper understanding of atomic and molecular science. For now, it was a fun way to introduce the concept.
*As a side note, I am not affiliated with Berean Builders, nor was this a promotional post beyond my personal experience and recommendation
Originally posted July, 2020
]]>For most of the meals and treats I make, one or both of them will stand beside me, ready to pour and mix ingredients (especially if it means a chance to lick a spoon). At this point, however, my six-year-old is showing signs of wanting more control over the kitchen for himself. When he decides he wants food, he’ll go in and make a sandwich or flavorsome toasted bread. He’s now tall enough for the microwave, and therefore finds any excuse to utilize it.
This makes sense to me. By eight or nine years old I remember learning how to make an omelet completely on my own, and from there I continued to build upon my cooking and baking abilities. He’s definitely getting to the age of independence.
I want to encourage this. Not only will it take a burden off of me when he’s able to put together a snack for himself and his sister, but it’s a skill he needs to develop. I want him to know his way around the kitchen, and I hope to foster his interest in making food.
I wanted to find a bunch of recipes specifically meant for children to prepare by themselves, but I was honestly disappointed with the options I came across. Sweet treats seemed to be the common theme for many of these recipes. While desserts are fun for special occasions, I want options I don’t mind him eating throughout the day. After all, this is something he doesn’t necessarily need permission to make. Of the healthier options I found, they mostly concentrated on arranging fruits, vegetables, and dip in cutesy designs. I don’t necessarily need a party platter here…just a little snack he can put some effort into whipping up.
So, it is now my mission to create a collection of recipes for small children. The idea is to essentially choose a snack for the week, demonstrating how to prepare it on Monday, leave the step-by-step instructions on the fridge, and allow him full reign when preparing that snack throughout the week. We’re in week one of trying this out and so far it’s going well.
It helps that I picked a great snack to start us out: Fruit Tacos.
The instructions are easy to follow and require little skill. As we continue building our recipe collection, the complicity will grow. For now, this is perfect! Even my 3 year old can do it.
Look out for more recipe ideas I have for little kids, and maybe I’ll even discuss some must-have kitchen gadgets that make cooking with kiddos both easier and safer.
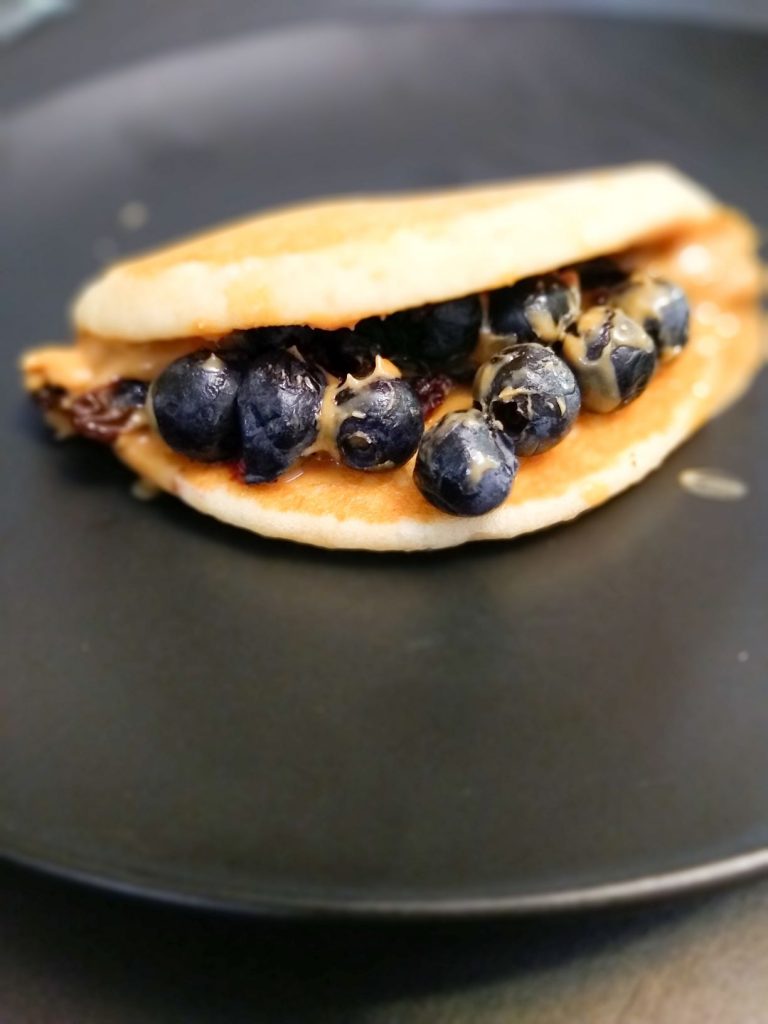

Fruit Taco
Ingredients
- Frozen pancakes
Spread Ideas
- Peanut butter or another nutty butter, yogurt, cream cheese, apple sauce, flavored butter (apple, pumpkin, etc.)
Fruits
- Strawberry, bananna, blueberry, raspberry, kiwi
Extras
- Raisins, nuts, coconut flakes, dried fruit,
Instructions
- Heat the pancake in either the microwave (30 seconds) or the toaster. Whichever your child is most comfortable doing on their own.
- Pick a spread and slather it across the pancake.
- Sprinkle fruits and other flavorful additions inside the pancake.
- Fold it up and enjoy!
It is hard finding healthy snacks! One of the difficult elements of my “job” is trying to keep up with appetites outside of mealtimes without resorting to foods heavy on sugar and sodium. I mean, for crying out loud, have you seen the ingredients in veggie straws? You know, that easy go-to snack we give our kids? That tiny bit of vegetable they use to justify their marketing is really a vehicle for salt. Similarly, it’s hard finding granola bars that are both delicious and lacking in chocolate of some kind. Of course, both of those choices are better than the goldfish crackers my kids tend to devour…but I digress.
I am constantly refilling my fridge with veggies and hummus, which is the easiest guilt-free snack I can keep around for the kiddos. But fresh vegetables are expensive considering the rate at which food is consumed in our house. I would also like to include more protein options that require little to no prep work on my part.
Peanut butter is honestly the unsung hero of snack food. It’s flavorful and packed with easy protein. Kids usually love it. And the best part is the versatility! I spread it on toast for breakfast. On apples, celery, or perhaps rice cakes for snacks. And who doesn’t love peanut butter and banana sandwiches when you’re looking for a special lunch option?
Recently I’ve scrambled to find snacks that meet current dietary restrictions. I need something filling and preferably packed with some type of nutrition. Protein bites seemed like an easy option, so I searched my pantry for the options. Most of these ingredients I find in bulk, making this easier on the wallet than constantly handing my kids “fresh” foods every time they announce they’re hungry. Not to mention, I originally tried this recipe with us adults in mind. The fact that the kids are now hooked on these things is a bonus. It’s a snack for literally any age!
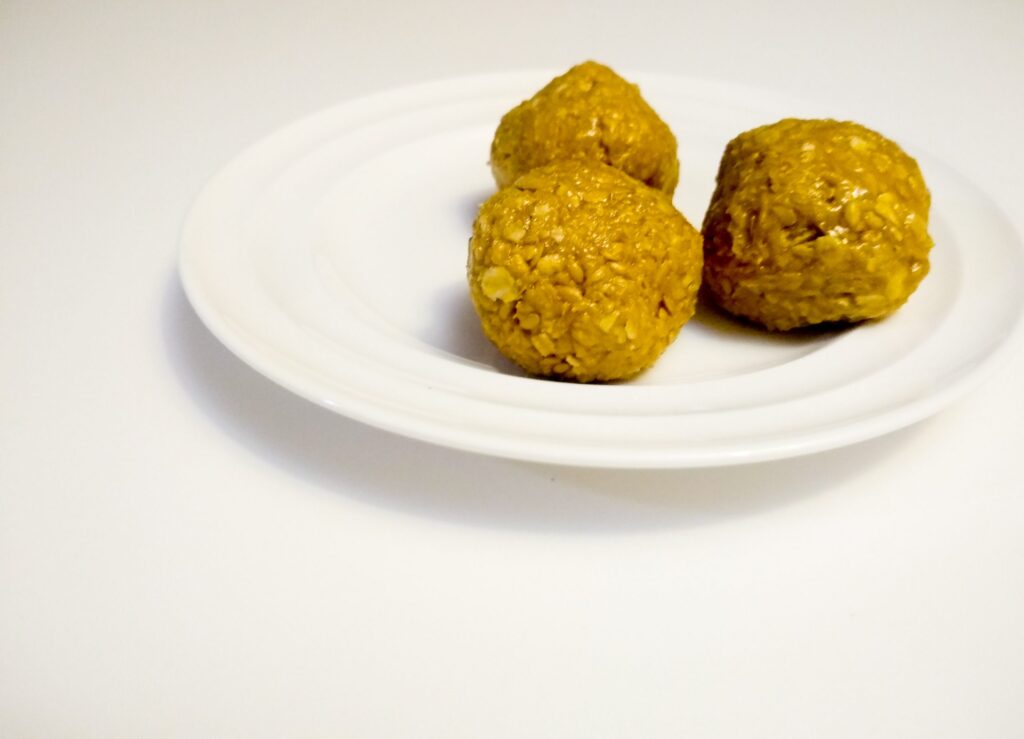
The unhealthiest thing about this recipe is the inclusion of honey for the purpose of flavor. Otherwise, it’s a delicious protein source you can feel good about feeding your family.
The flaxseed is optional, though for those who do not have an allergy this is a terrific source of omega 3 fatty acids (good fats!) and fiber. It’s been shown to reduce the risks of cancer, heart disease, stroke, diabetes, and potentially inflammation (supposedly. I’m not a doctor). Definitely an added bonus to snack time!

5 Ingredients Protein Bites
Ingredients
- 1 Cup Peanut Butter
- 1 Cup Old Fashioned Oats
- 1/2 Cup Coconut Flakes
- 1/2 Cup Flax Seeds
- 3 Tbsp Honey
Instructions
- Using a stand or hand mixer, combine all ingredients together until well combined.
- Once combined, roll a spoonful of the mix between hands to form a ball.
- Once all of the bites are formed. Place them in the refrigerator to harden. Enjoy after 2-4 hours!
In fact, I didn’t have enough credits to walk at graduation, and I spent a few weeks after my senior year rushing through makeup work trying to pass alternative credit options. I did eventually receive my diploma, but I maintained a hyper-awareness of the fact that I didn’t deserve it. The trauma of my educational experience followed me since third grade, and year after year I faced one failure after another. As my middle school geography teacher once put it, I dug myself a hole I couldn’t crawl out of. I continued to fall further behind until I completely gave up on myself and accepted the fact that I was stupid.
From a young age, this version of reality settled deep in my mind and followed me into adulthood. To this day I avoid calculating simple math in front of others. I get nervous reading out loud. Sometimes I stop myself from contributing to a conversation, fearing I might say something dumb. How can someone like me successfully homeschool?
You might be asking this same question right now. With the disruption COVID 19 created, it’s scary to consider how the current chaos might impact your child’s education, and you wouldn’t be alone if the possibility of homeschooling crossed your mind. You also wouldn’t be the first person to shy away from the idea of homeschooling due to a negative experience in school. In fact, regardless of a person’s past academic success or failure, it’s normal to second guess your ability to teach.
If homeschooling is something you’ve thought about, but you’re afraid you lack the skills necessary to provide your child with a decent education, don’t give up before you give yourself a chance. I’m certainly glad I powered through my fears and decided to pursue this lifestyle, and I strongly encourage other parents to consider a number of points before dismissing their abilities:
If you had a negative experience in school, it is all the more reason to choose something different for your kids.
School isn’t terrible for everyone, but many children suffer under the system. It’s unavoidable, and parents have little to no control over finding a solution for their child as long as they are sending them into that system. You cannot dictate how a teacher instructs, and you have no say in the pace at which subjects are taught. If there is a problem, there are only so many solutions the school can try. Think back to what failed you, and instead of questioning whether or not you’re good enough for your child, ask whether or not the system is the one that’s good enough.
Schools operate under a system of labeling and dividing children into categories. That does not mean their assessment of a child is accurate.
I fell behind in 3rd grade, shortly after my mother died. However, a parent dying was not the cause of my academic struggle. The fact that I had been removed from my regular class and placed in “intervention” every day was the problem. The school meant well. They tried to help. Instead, they made an already horrible situation worse (someday I may go into detail about that in another post). I never recovered from that experience, and I now know it was a severe misjudgment on the school’s part. Over time I’ve come to terms with the fact that it wasn’t an intentional or malicious attempt to program me into believing I’m stupid. However, intentions do not matter to a failing child, and looking back I realize they were wrong on so many levels regardless of their efforts. Without fully knowing who I am, they assessed and categorized me.
If that is your experience, consider how a childhood label may not fully describe who you are. Children don’t hate learning. They are naturally curious and eager to discover the intricacies of the world. If you hated school, it’s because someone ingrained that into you. The good news, however, is that it’s not too late to reprogram your thinking. Will you ever be rid of self-consciousness? Probably not. Can you re-learn how to learn? Yes. Actually, you can. And you will.
You have resources!
Depending on individual state laws, teaming up with other homeschool families and/or a tutor is a perfectly acceptable way to homeschool. Also keep in mind that as children get older, there are online classes and even community college classes (usually for free early college credit!) that are available for homeschoolers to take advantage of. Homeschooling does not necessarily mean you are going to be the only teacher. It is what you make it. Do you have a friend who is also considering homeschooling? Team up! Your kids don’t even have to be in the same exact grade.
As far as the actual teaching…
If you haven’t started browsing the curriculums out there, let me go ahead and warn you how overwhelming it is. There are a lot. How do you choose the right fit? For one thing, you want to consider what type of learning is most effective for your child. On the other hand, you also need to consider what will work best for you. Personally, I chose curriculums that require little to no preparation on my part. I also chose curriculums that either provide most of the instruction or helped me learn alongside my kids. In the end, the important thing is to not be afraid of what you don’t know. In fact, I believe that not knowing everything is terrific because…
Homeschoolers learn independence early because choosing to homeschool automatically teaches them independence by example
It is absolutely okay to admit to your “student” that you don’t know the answer to a question. This is a teachable moment in and of itself because it allows you to demonstrate that grown-ups don’t have all the answers, and research is powerful. Education is teamwork in a homeschool. Your role is to guide them while they explore and learn, and sometimes you work together in order to find the answers. At older ages, homeschooled children generally have the capability to take a more direct role in their education. Chances are they will do a lot more independent work that will require significantly less instruction from you.
If you’re holding yourself back because of fear, consider the example you would be setting for your children if you decided you were capable of learning.
Inspiring, isn’t it?
Homeschooling can heal.
I cannot promise you will ever recover from a negative experience with school. We are deep into our homeschooling lifestyle and I’m about to graduate college (at 30 years old) with the highest honors, yet I still feel a certain kind of hurt and self-consciousness I will probably carry for the rest of my life. However, homeschooling has restored something
in me.
A lot, actually.
Deciding not to send my children to public school has allowed me to come to terms with the fact that I was left behind in the system. While I cannot change my history, I can take control over what my family experiences. Not only does it allow me to break a cycle, but through homeschooling, I realized I’m capable of more than I assumed I could ever handle.
In fact, one of the greatest compliments I will ever receive in life is the fact that my husband trusts me with our children’s education. He knows who I am, and he understands my weaknesses. He is also the only other person who loves and cares for our kids the way I do. He will never make a decision that might jeopardize them, yet he not only trusts me but expects me to provide them with a well-rounded and complete education. That speaks volumes.
Support is also found outside of the house when it comes to home education. The homeschool community is full of other parents who are ready to offer mentorship, encouragement, and solidarity. Everyone needs it, therefore everyone is eager to dish it. You don’t have to do this alone, and before you know it you will be in those Facebook groups and on those co-op field trips ready to offer your own encouragement to the next parent who decided to test the waters of homeschooling.
Nothing that I say will ever erase the uneasiness you feel when considering the option to homeschool. However, I can assure you from my personal experience that pushing aside this hesitancy and following through with this decision is an invigorating experience.
It reshapes the way you view yourself.
It sets an example for your children.
It heals.
It’s one of those things that cannot be explained. You just need to experience it for yourself.
Originally posted July, 2020
]]>Then COVID 19 happened, and we found this summer completely turned upside down. No visits to the public pool. No karate camp. No vacations. No beach trips. No going out with friends. Even the playground is off-limits. Aside from a week-long trip to my in-law’s lake house (by ourselves), our entire summer is kept within the confines of our home, especially as a family with vulnerable health. The kids have consumed more screen time than I ever thought I’d allow, and we are all struggling with boredom.
I gave in and decided that If I’m curious about a year-round schedule this is the year to give it a try. If anything it will open up our time to enjoy freedom once we’re able to safely go out and about again. For now, it gives the kids and me something productive to do, and both “students” are excited to have the routine.
Now that I have a 6-year-old going on 7 in a couple of months, we finally filed our notice of intent with the state. That means we now have an official school name:
Salterrae Academy
.
What does that mean? How did we come up with that?
Well.
It’s Latin for “salt of the earth”, which we took from Matthew 5:13-16. Not only is this in reference to the foundational teaching of Yeshua’s (Jesus’s) sermon on the mount, but it’s the first Bible verse my kids memorize as we repeat it every Friday night at the beginning of the Sabbath. Once we came up with the idea, it felt right. It fit our family perfectly.
As far as our curriculum…
After doing this for a few years now, I’m really loving the collection of curriculums I’ve put together. I’m a modge-podge homeschooler, meaning I’ve built our classroom from a variety of sources, pulling each subject from individual curriculums specialized in their specific subjects. For those who haven’t found their homeschooling stride, I’ll go ahead and disclaim that this isn’t the only way to teach your kids. It’s also not necessarily the cheapest (though there are plenty of tips and tricks to save money), and many homeschool families get away with significantly less than this. Some homeschoolers do the “un-schooling” thing and use no official curriculum at all. Others love curriculums that are “all in one”. The options are endless. This just so happens to be our particular flavor of education.
After the first couple of weeks of school, I am truly loving my choices, and I can already see how these curriculums are going to give us a terrific year.
What exactly am I using, and why do I love them? Here’s what we’ve got:
Math U See (by Demme Learning): If there is one curriculum I swear by, it’s this one. My son adores math thanks to this curriculum, and although I grew up hating math I’m discovering a new appreciation for numbers after using this resource. I will never say a curriculum will work for everyone, but this is one I suggest new homeschoolers try if they’re in the market. The best part? There is literally no prep on my end. It’s 100% an open-and-go curriculum.
Science In The Ancient World (by Berean Builder’s Elementary Series): I wanted a simple, hands-on, and fun science curriculum for the early years. This is definitely everything we needed. I also love the unique structure of the series, which explores the chronological development of science over time. The first book focuses on the order of creation, with each of the seven units concentrating on the theme of each day (unit one explores the science of light, unit two water, unit three botany, etc.). From there you go through history. This year our focus is science from ancient periods, and next year we will move into the era of the scientific revolution. The best part about this curriculum is the fact that each lesson has a simple and stress-free experiment designed to use materials a household typically has on hand (or can easily get a hold of). Once again, very little prep on my end aside from looking over the experiments and making sure I have what we need.
ARTistic Pursuits: I wanted to include more art this year. My kids loved our visits to the art museum, and they especially love creating. Not only am I looking forward to a year of fun art projects, but this series focuses on art appreciation as well. And one of my favorite things? They give you a list of supplies necessary for the entire curriculum (or you can buy them in a package through the store). Once they’re purchased and set aside, I’m done with any preparation the lessons require.
Our 50 States (by Notgrass History): In the past, I was committed to Tapestry of Grace. I wanted to love it, but it’s just not the right fit for us. In a way, I felt relieved when I gave up on TOG because that left us open to Notgrass. We originally found them at a homeschool conference a number of years ago. Of course, as a history buff, I fell in love with their stuff, and I should have known we’d end up using their curriculum. It definitely has my mark of approval so far. We’ll begin our Notgrass journey with US geography starting in August. They just released this brand spanking new curriculum and we are one of the first to give it a try once they ship out! It looks very promising.
Before Five In A Row/Five In A Row: We are glued to this curriculum. I just can’t get away from it. In the earliest years, it provided most of what we needed, and now it remains a foundational aspect of our school even while we gather other curriculums on top of it. The concept is simple: each week is designed around a particular children’s book. Every day you incorporate a lesson from any variety of subjects based on a concept pulled from these stories. I love this curriculum in a way that will resonate with me forever. Does this curriculum require a lot of prep and setup? Well, that depends. It can be as little or as much as you prefer. Sometimes I contribute zero prep work, while other times I plan fun activities that require a little time. But that is completely up to your discretion, and it can change from one day to the next.
Evan-Moore workbooks:
These are great for a variety of ages! My daughter wanted her own set of workbooks for schoolwork, so I grabbed an alphabet book by Evan-Moor. They have a large variety of workbooks in any subject you can think of, and so far we’ve had a good experience with everyone we’ve tried.
Stick Figuring Through The Bible (by Grapevine Studies): For our Bible studies we use a simple curriculum that focuses on familiarity with Bible stories. As we go through the Bible, the kids illustrate the scenes through stick figure drawings. My favorite part about this group, however, is their focus on biblical holidays and the Jewishness of the Bible. I love using their curriculum, I love supporting them, and having spoken to them at a conference I’m excited about future developments they have in store (such as a PaRDeS program).
All About Spelling (by All About Learning Press): I’ve struggled with finding a stress-free yet effective way to teach spelling. However, as I researched these resources, I fell in love with the All About Learning programs. The curriculum dives into the intricacies of the rules which govern phonics and spelling (in fact, by middle school students using this program are expected to understand the Latin, Greek, and Germanic roots of our language). Yet the lessons are fun, interesting, and hands-on. I’m interested to see how much my son improves in spelling. And of course, I should mention that this is yet another curriculum that requires little effort on my part.
Handwriting Without Tears (by Learning Without Tears): I feel like every other homeschooler uses this curriculum. I ended up adding it last minute when I decided I wanted to include something that specifically developed handwriting. So far it’s been great! The lessons are simple and there really are no tears! (As you can guess, this is another open and go!)
GUM (by Zaner-Bloser): Of the curriculums we have, Grammar, Usage, and Mechanics is the curriculum I’m least committed to. That’s not to say we won’t find success with it. For the most part, I think it will work just fine. It’s a workbook, which my son actually enjoys, and it has a lot of depth I’m hoping he will pick up. We’ll see how it goes!
All About Reading (by All About Learning Press): Similar to the spelling curriculum from the same company, I adore All About Reading. From phonics to comprehension, this curriculum teaches all the important components necessary for effective reading skills. Also similar to All About Spelling, the lessons are hands-on and fun. So far my son has had a blast with the activities. And of course, as if you haven’t figured out by now that I prefer “open and go” curriculums, this one requires no preparation on my part.
Tiyulim: Journeys A Hebrew Primer (by Torah Aura Productions): In our family, we want to continue improving our Hebrew. This workbook is a gentle way to practice reading Hebrew while also building vocabulary.
I’m grateful that despite current events, our new school year is off to a great start. It feels good to have something normal and routine keeping us busy as we get through a tough time. For us, homeschooling was a decision we made before having kids, so the disruption COVID caused is minimal with regard to education. However, for many parents homeschooling is suddenly a rushed decision they are attempting to understand within the next couple of weeks. And honestly, I believe people are going to find they love it way more than expected.
I’ve received a lot of messages from friends who are considering homeschooling, and I’ve had many questions thrown my way as parents weigh their options. Now that we’re in the swing of our new school year, and I’m feeling refreshed and ready, I’ll share a number of blogs explaining my perspective of questions and concerns parents have asked with regards to homeschooling.

Originally Posted July, 2020
]]>They have a magical ability to manifest imaginary ice cream out of nothing and turn any location into an ice cream parlor. In fact, on the first day of preschool, my son claimed “ice cream man” as his dream job.
My kids are seriously dedicated to ice cream, but who isn’t?
With summer here, I wanted to do a little something to enhance their experience with the fantasy ice cream business. I know there are a number of Play-Doh sets themed after ice cream shops, but we honestly have enough Play-Doh-related tools and the color of the dough turns ugly after a few minutes of manipulation by a toddler.
And, to be completely honest, I recently discovered a really cool way to make non-toxic play dough, and I wanted to see if it works.
Surprisingly, it worked extremely well!
The ingredients might be a little intimidating for parents, especially those of the healthy variety. It seems like the consistency should be sticky and gross, and it is certainly a lot of sugar to put in front of kids. However, this worked out significantly better than I thought. The texture of the dough matched pretty closely with traditional Play-Doh, and since I didn’t tell my kids (right away) how I made the dough, eating it didn’t occur to them…
Eventually, my son did ask me about the ingredients, and I didn’t want to lie.
But! The end result is so sickeningly sweet, he didn’t eat anymore beyond an initial taste test. My daughter, on the other hand, kept licking her “ice cream”, but after a few licks, she got sick of the taste.
This activity was easy to set up, and it kept my kids entertained for hours. Sure, they could (and often do) play ice cream shop with nothing more than their imaginations, but every now and then it’s fun to make their fantasies come alive!
What You Need:
Store-bought frosting
Powdered sugar
Optional:
Food coloring
Ice cream scooper
Small aluminum loaf containers
Sprinkles
Ice cream cones
Instructions:
Choose frosting flavors that match the colors you want. We bought a pink, purple, and white (which we turned into a minty blue using food coloring. Just mix it in before adding the powdered sugar).
Using a spoon, mix your powdered sugar and frosting together. The ratio should be 1:3 (for every 1 cup of frosting, add 3 cups of powdered sugar). If the dough is too sticky, sprinkle in more powdered sugar until it reaches a similar texture to Play-Doh. Eventually, the frosting will clump, and you may need to knead the dough with your hands once it is no longer gooey and sticky.
To really heighten the experience, put the “ice cream” dough in aluminum loaf tins. Give the kids an ice cream scoop (it scoops wonderfully!), sprinkles (or maybe confetti or something else that can substitute sprinkles), and ice cream cones. Don’t forget bowls and spoons as well!
While this recipe does not last forever, it did keep my kids entertained for a couple of days before we had to toss it. But, it’s so easy, I can definitely do this again without stress!
Originally published 6/25/2019
]]>While body riding waves is something spectacular, a child’s true enjoyment is in the sand. It keeps them entertained literally all day long, and while I do keep a watchful eye over them as they play, the endless supply of sand offers me an opportunity to take a break from hovering. My daughter was particularly in love with the gritty mess. So much so, she basically bathed in it…
On the other hand, taking my family to the beach doesn’t necessarily mean I check out for the entire time. On top of making sure we pack enough sunscreen, food, and novels, I also like to plan unique activities. This time around, I discovered an awesome craft!
This was an especially easy activity, and even though it may have gotten messy at certain moments, a quick rinse in the sea took care of that hassle.
All You Need Is:
food coloring, zip lock bags, and if you’re wanting to take your craft home, a bottle of some sort, as well as a funnel. I found plastic and glass tubes on sale at Joann Fabrics. I believe they were something along the lines of “glitter mixing tubes”. They were the bare minimum of what I needed for this activity because I wanted to get enough supplies for the adults to participate too (I know my friends pretty well. As expected, they totally made their own). However, if I do this again and I’m looking to do no more than one or two bottles, there were also larger decorative bottles with corks.
Another tool to consider is something thin and pointy to make designs with your sand. A wooden dowel rod
works fine, especially if it has a pointed end. Usually, you can find these in the cake decorating section of Walmart or craft stores.
The activity itself is simple. Fill a ziplock bag with sand, drop food coloring in, and start shaking. If you want to fill bottles, snip the corner of a bag, fit the funnel over the bottle’s mouth, and fill it with your choice of alternating colors until the bottle is packed full. For a really cool effect, stick a rod down the sides of the bottle to make funky designs with the alternating color layers.
On the other hand…this activity does not need to be a craft you take home! If you’re looking for some colorful beach fun that doesn’t come back with you (because let’s be honest, enough sand will follow you home without you trying), simply drop food coloring onto the ground and mix it in with a pile of sand. The result is vibrant beach sand to make unique and creative sandcastles.
This was truly an awesome beginning to our summer season, and I cannot wait to see what other activities we’ll discover in the next couple of months. At the very least, I’m going to pack food coloring for our next beach trip!
Originally published 7/10/2019
]]>