This is where Valentine’s Day comes in! For most of society, the day is associated with romance. For me, it simply gives character to a monotonous time of year. Just as twinkle lights illuminate the dark month of December, the bright reds and pinks add a spark of charm to get us through a dull period.
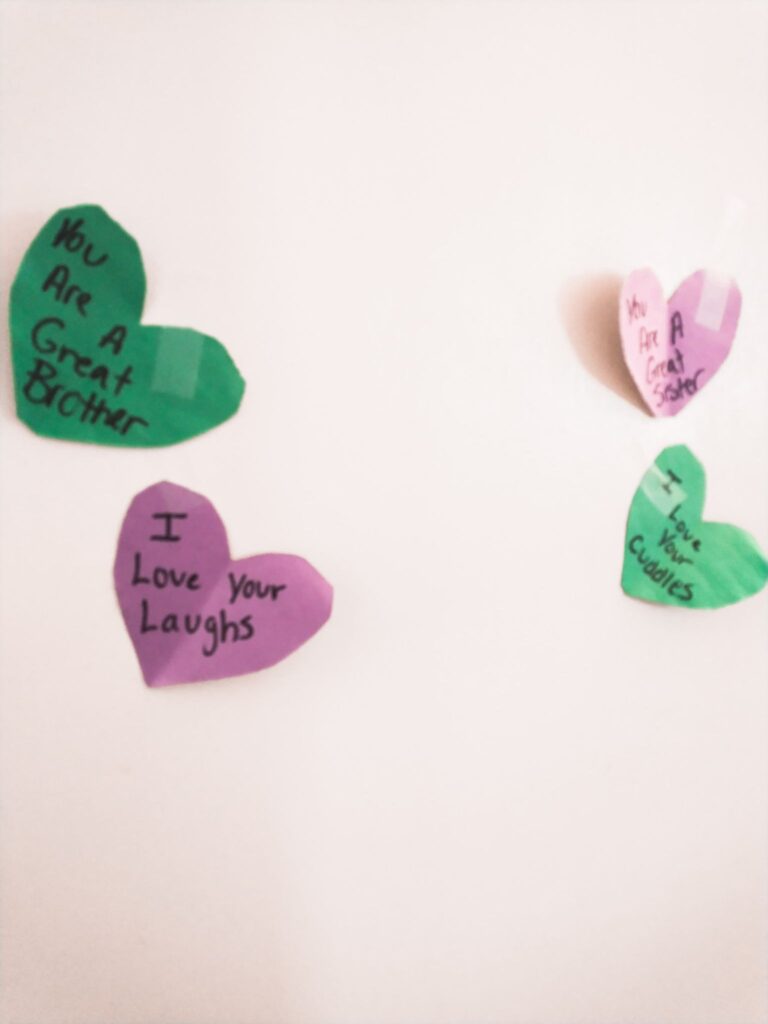
My husband and I rarely do much for Valentine’s Day. Crowds are obnoxious, and dating happens year-round. Sometimes we use it as an excuse to give gifts, but there is no obligation to do so. Throughout the first couple weeks of the month, however, we find little ways to celebrate love as a family. On February 1st, my kids wake up to a heart posted on their bedroom doors with a notes detailing something I love about them. Every morning they find a new heart until they receive a small Valentine’s Day goodie bag waiting for them on the 14th.
What is especially fun this time of year, are the crafts! Who doesn’t have core memories of making popsicle stick picture frames and heart-shaped cards for their parents? Does anyone else get that warm fuzzy feeling when they recall a scene of dripping glue bottles, spilled glitter, and scraps of red, pink, and white paper scattered across a school table?
Remembering it for yourself is one thing. Imagining it as an adult may cause a conniption. What is it they say? Glitter is the herpes of art supplies?
However, mayhem is not necessarily required for arts and crafts with small children. The other day I wanted a creative activity to try, but lately, I’ve struggled to keep up with housework. I didn’t want additional chaos added to my life.
As it turns out, this dilemma is the perfect opportunity for washi tape.
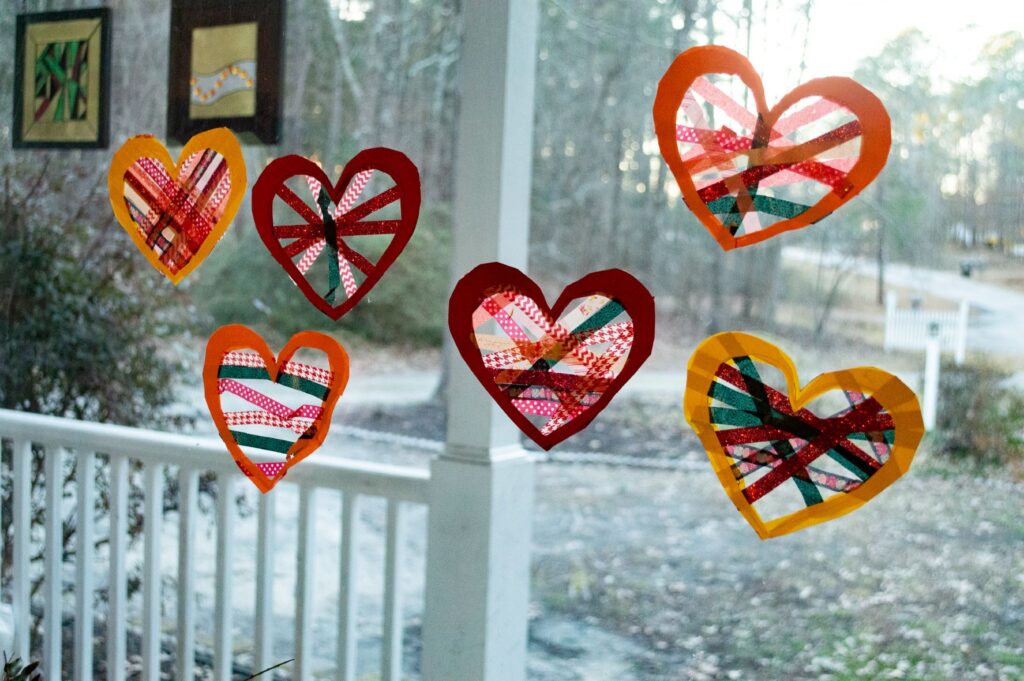
These suncatchers are easy peasy to make and look adorable displayed in windows. Go wild in choosing washi tape designs, and have fun lining different patterns across the hearts. As an added bonus, you can still achieve that traditional Valentine’s Day glitter without leaving your house in a wreck, thanks to sparkly designs currently available at Michaels.
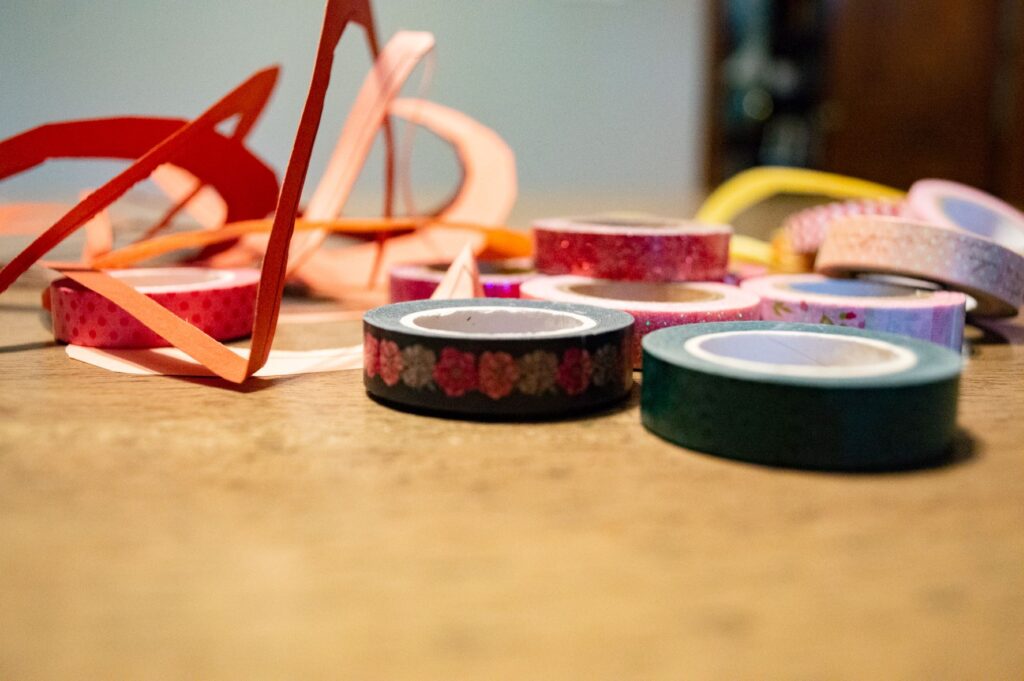
To get started on these beauties, you’ll need to gather a few basic supplies:
Themed washi tape
Glue stick
Scissors
This print out on colorful construction paper or cardstock:
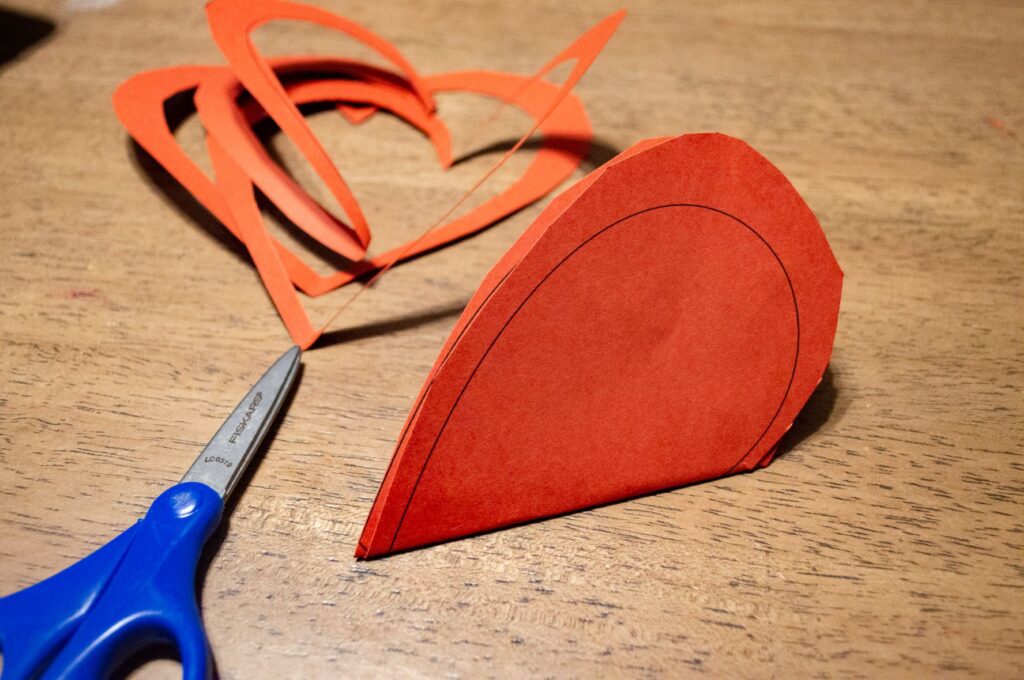
To begin, use your colorful cardstock/construction paper to print out the hearts. Each print will make one suncatcher.

Using the outer lines as your guide, cut out each heart. Next, you will cut out the inner heart. To make this easier, fold your heart in half and follow the inner line just as you would make a normal paper heart.
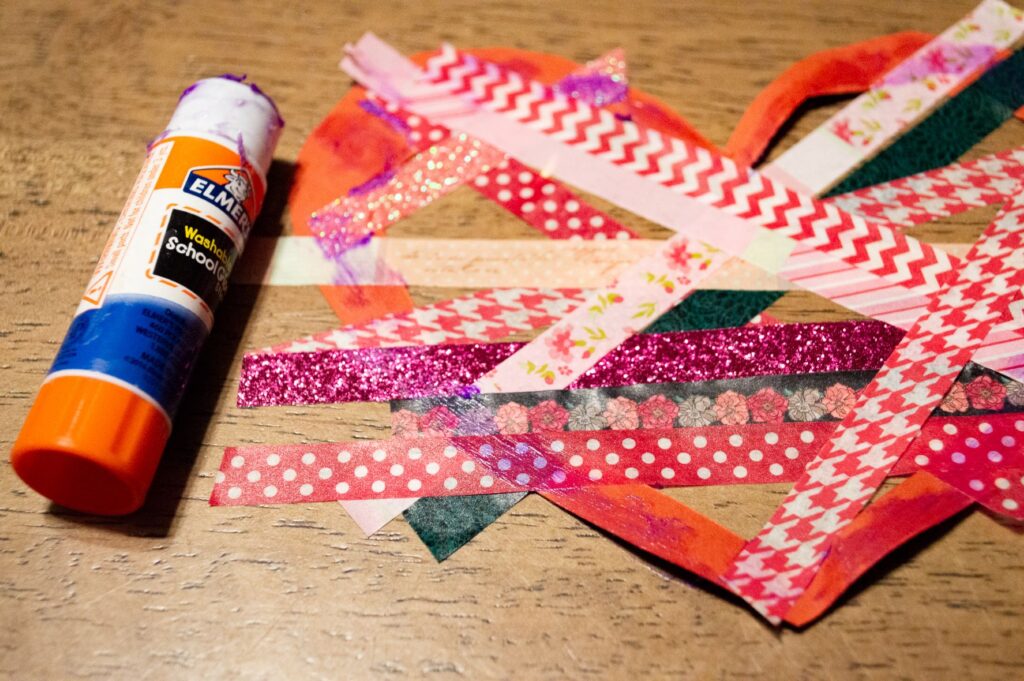
Next is the fun part! Lay strips of washi tape across one of your heart cutouts. Play with any designs or patterns that inspire you!
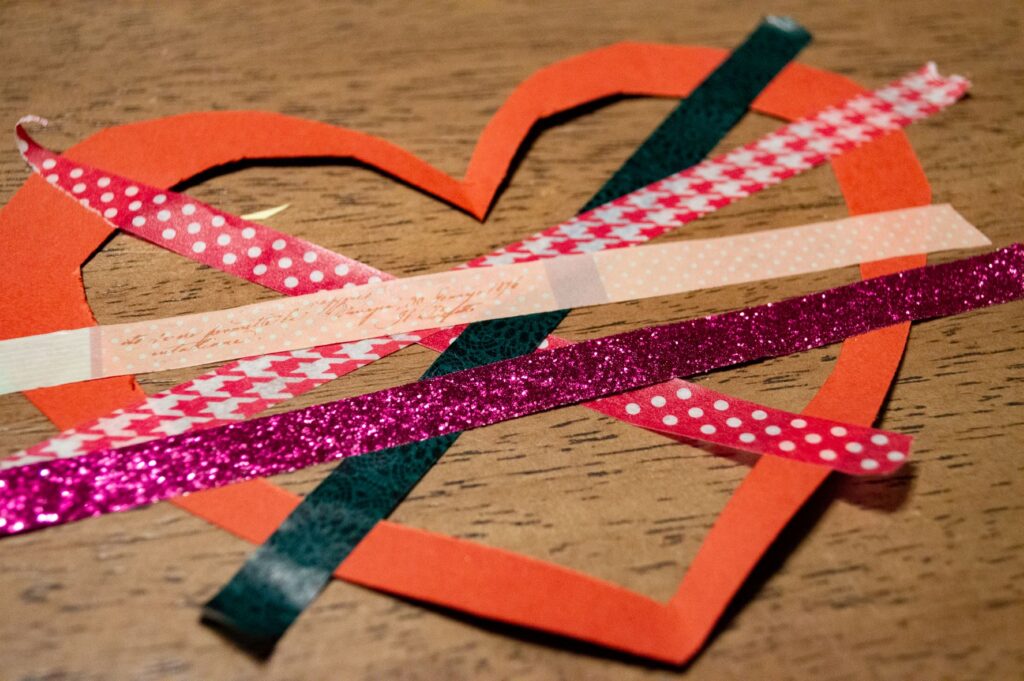
You can cover as little or as much of the heart as you want. When finished, run a glue stick on the surface of the heart (on the non-sticky side of the washi tape). Cover your heart with the second heart cut out. Trim any access washi tape from the edges.
Press the sticky side of the washi tape to your windows, and enjoy these lovely suncatchers!
For those not in the know, epoxy resin is a liquid adhesive that dries into a shiny and clear plastic. The resin typically used in small DIY projects is easily found in craft stores, as well as major retailers such as Walmart and Amazon. While it is necessary to use gloves and take precautions to minimize a mess, the resin is relatively easy to use.
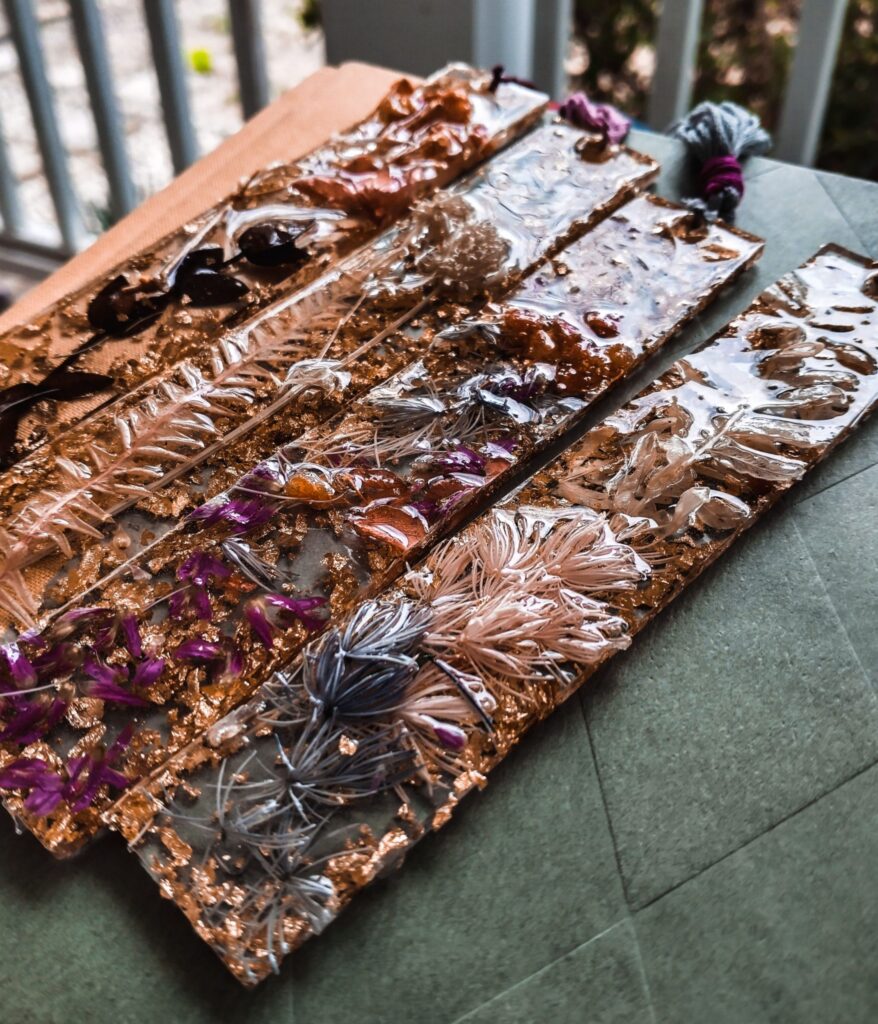
Jewelry is a popular project for resin users, but with the right molds, anything is possible! As much as I adore the stunning necklaces and earrings created with resin, my absolute favorite project so far is bookmarks!
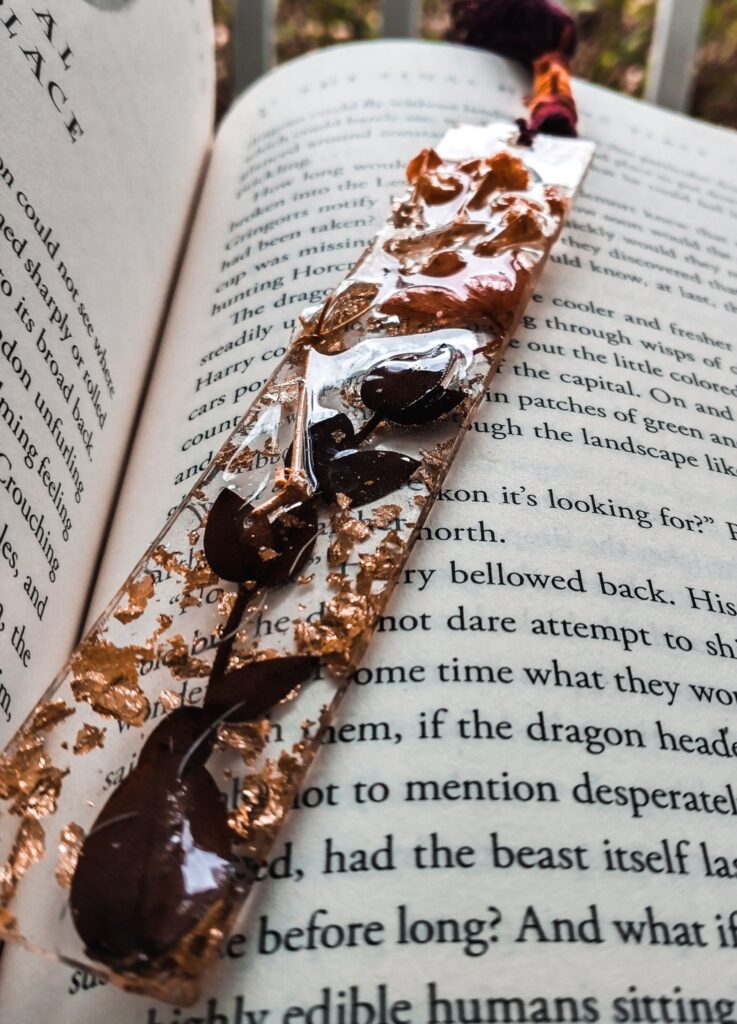
That shouldn’t be a surprise. As an obsessive reader, I love fun and fancy bookmarks! The end result of this project filled me with joy, and I look forward to making more of these in the future. For my next idea, I’ll use specific dyes and embellishments to match the theme of Hogwarts houses (I’m almost finished rereading Harry Potter, so that is currently on my mind). These will also make special gifts for my fellow bookworm friends.
Before working with resin, consider health and safety measures when setting up your space. Work in a well-ventilated area, preferably outside if possible. Wear a mask to avoid breathing in toxic fumes. To avoid skin irritation, wear disposable gloves. If resin does come in contact with your skin, immediately use warm water and soap. If this does not work, vinegar and/or nail polish remover should do the trick.
What you need:
Two mixing cups (these usually come with the kit)
2 or 3 stirring sticks (popsicle sticks work well if your kit did not provide them)
embellishments (dyes, glitter, gold foil, dried flowers, confetti, etc.)
Directions:
To begin, arrange dried flowers, confetti, or any other embellishments inside the bookmark molds.
Glitter, dyes, and gold leaf will be added later.
Next, mix the resin. Prepare to work fast! Use a popsicle stick to mix equal parts of resin and hardener (the two bottles that come in the kit) in one of the mixing cups. To make 4 bookmarks, you only need 1/4 cup of each. Mix for about 2-3 minutes.
Pour the resin mixture into the second mixing cup. Mix for another minute. At this point, you can incorporate glitter/dyes/gold leaf. Mix until well incorporated.
Slowly pour the resin into the molds, filling them no more than halfway. Using a new popsicle stick, carefully spread the resin evenly across the mold. Air bubbles are okay if you prefer the look of them in the finished product, but if you want a smoother style, use the popsicle stick to pop any air bubbles you see.
Set the molds aside in a well-ventilated area. Allow them to sit for 24-48 hours. When dried, pop them out of the molds!
For pazzazz, add tassels to the top of the bookmarks.
Originally posted March 2021
.
I adore mornings. I love the sensation of getting bundles of chores and responsibilities accomplished before noon. At the same time, I’m not a morning person. I’m a natural night owl who comes alive once the world turns dark.
I want to discover the secrets of morning people! I wish I jumped out of bed at 5 AM to spend alone time with my journal and Bible, followed by a good exercise/yoga session. In my morning-person fantasy, I’d then whip up a healthy from-scratch breakfast so the kids rise to the delicious smell of food waiting for them. We sit down to eat together before I casually get myself out of loungewear and into real clothes. I put effort into my hair, do some chores, and then we all settle at the school table with chipper little grins on our faces ready to learn!
That isn’t happening. In all reality, I hit the snooze button for as long as possible. I give myself just enough time to roll out of bed, throw on some clothes, rally the kids to get dressed, pour bowls of cereal, and get us started on our first assignment as we eat. All of this happening while I’m still trying to wake up.
I have the ultimate love/hate relationship with mornings. I just don’t have that early bird drive in me. I’ve found, however, I can make the situation easier if I give myself a little something to look forward to. Admittedly, that is often in the form of food. Or in this case…a drink.
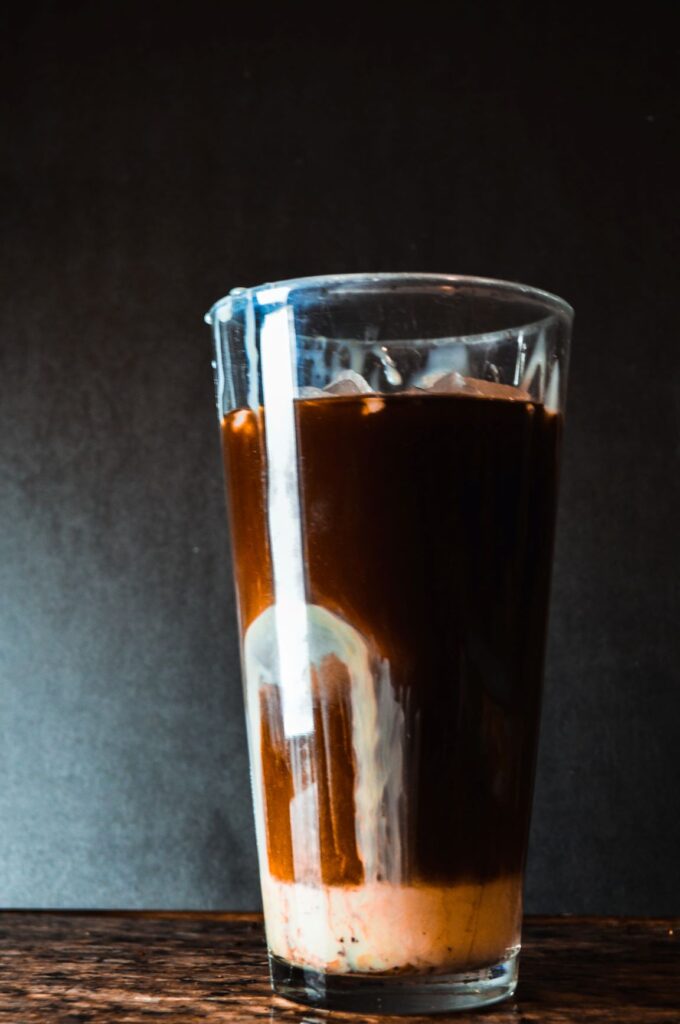
Knowing I had cold brew coffee steeping in the fridge gave me an extra push to get out of bed this morning. Coffee is the best part of mornings, and today I treated myself well!
I’m a hint of bougie in that I typically use freshly ground coffee (Counter Culture is my go-to!), and following an infusion, the recipe makes the taste even bolder and better. In this recipe, I used roughly two tablespoons of sweetened condensed milk for a rich flavor, and while the color lightened quite drastically I felt the sweetness didn’t overpower the dark and bitter taste. If you prefer no sweetness at all, it is perfectly okay to omit the sweetened condensed milk altogether. I too have days like that.
Infused Cold Brew Coffee
Ingredients
- 1 Cup Freshly ground coffee
- Water
- Sweetened condensed milk (to taste)
Instructions
- Fill a 32 oz mason jar with water and coffee. Seal tightly and shake until well mixed.
- Refrigerate over-night (at least 14 hours). After the coffee has steeped, pour the contents into a French press and push grounds to the bottom of the pot. Alternatively, use a couple layers of cheese cloth or coffee filters to strain the coffee.
- Drizzle sweetened condensed milk into the coffee, to taste.
Originally posted February 2021
]]>A righteous man named Honi comes across another man planting a carob tree. When Honi asked how long it takes the tree to bear fruit, the man answered 70 years. Honi responded, “Are you certain you will live for another 70 years?”. The man explained that while he personally will not experience the literal fruits of his labor, he is planting the tree for future generations to enjoy. Honi then sat down, ate, and fell asleep. Rather than a brief nap, Honi woke up 70 years later to find a man gathering carob pods from the tree. He asked, “Are you the one who planted this tree?”. The man responded that no, it was his grandfather who planted the tree.
From what I understand, carob fruition takes closer to six or seven years rather than the decades described by the planter in the narrative. Despite this technicality, the carob tree still offers the same valuable lesson. They are slower to grow than other trees and continue to produce for over 100 years. The point is that the carob tree, much like our actions, is something that will impact future generations. A carob tree can feed someone 107 years after it is planted. Similarly, while we may not be around to experience the full result of our deeds, we are to try and make the world a better place for those who continue after us.
I love the symbology Jewish tradition has built around the carob, but it leaves one question:
What the hell is carob?
Those who remember the natural foods movement in the 70s probably already know from experience, but carob is a sweet and non-bitter legume often used as a healthy alternative to chocolate due to its lack of caffeine and theobromine. Despite the slight distraction of the 1980s and ’90s, crunchy culture has consumers once again focused on health and natural eating, making carob available in just about any form that has a chocolate equivalent (bars, chips, powders, etc.).
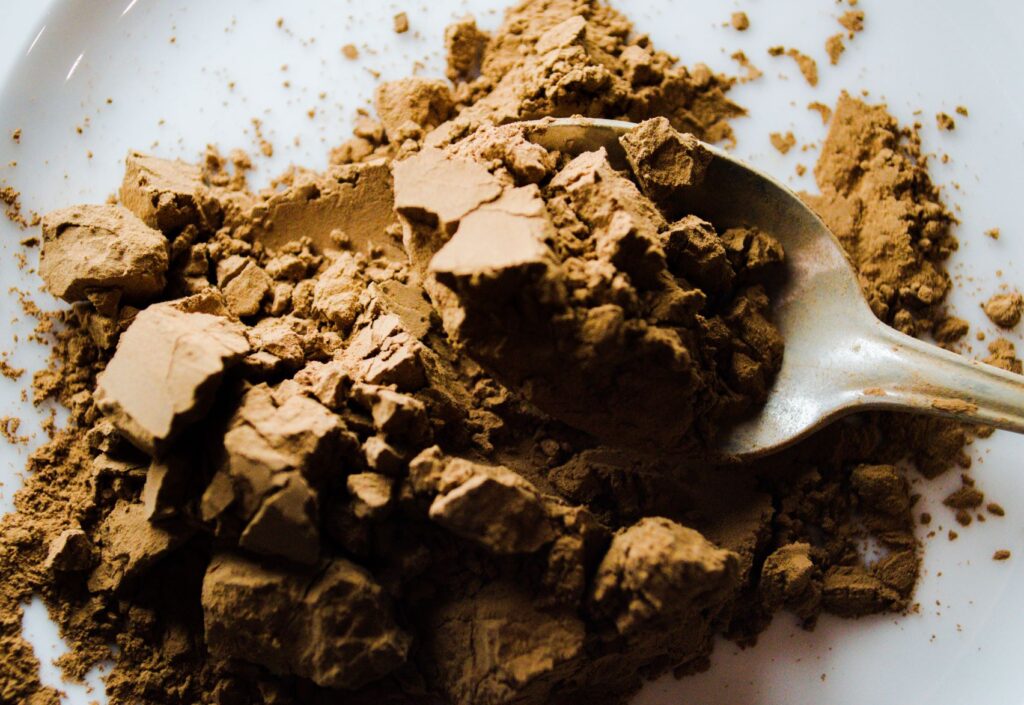
I am not entirely fooled. Carob does not replace chocolate, though with a little extra concocting it can hold one over if the cravings get rough. However, I do appreciate carob as its own flavor. While it cannot fully substitute the bliss of chocolate, the sweet-tasting pod offers a variety of delicious culinary possibilities.
Carob not only lacks caffeine but provides a number of other health benefits as well. Low fat. High in fiber. Lowers blood sugar. Improves cholesterol. Not to mention, it benefits general “gut health”. No, it’s not the miracle chocolate replacer that the mothers of the 1970s collectively used to bate and switch their children, but the healthy components of carob offer us the option to create unique and delectable snacks that satisfy our sweet tooth guilt-free.
For example: Carob and Berry Tarts.

As I’m once again back to finding dairy-free and chocolate-free treats due to current dietary restrictions within the family, these seemed like a possible alternative when looking for something to whip up.
While the sweet and bitter-less carob is a featured ingredient, the flavor is further enhanced by dates, honey, and a berry spread. This time around, I chose strawberries as the base for the spread, primarily to embellish the tarts with a pinkish tint for Valentine’s day.
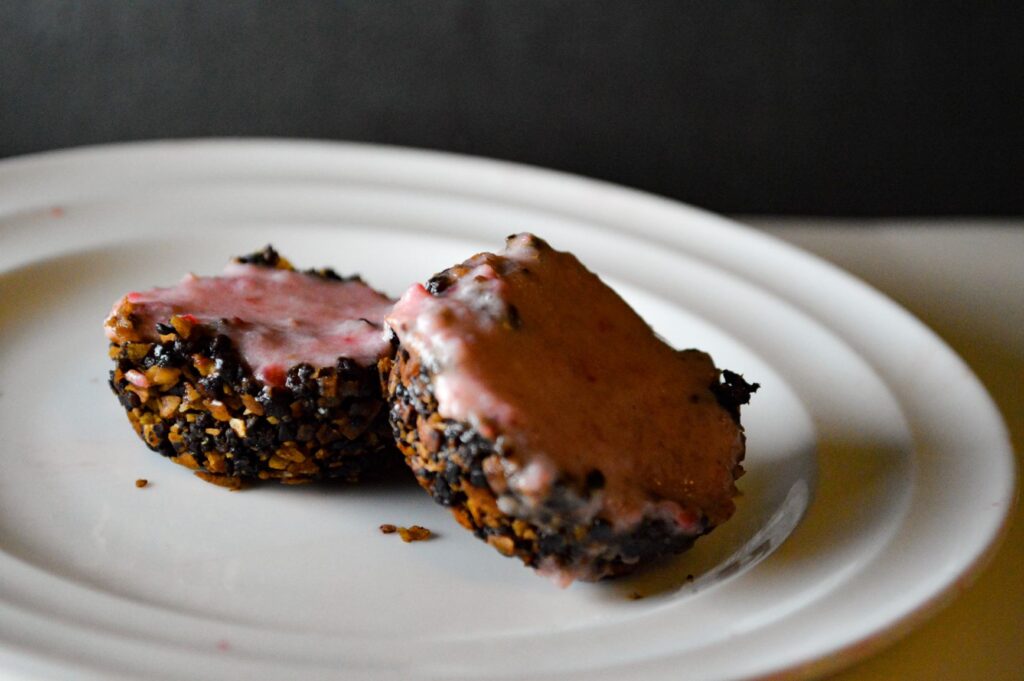
With that said, the most important thing to remember when making carob tarts:
After taking them out of the oven and allowing them to cool and form, don’t forget to share them with someone you love.
After all, it is almost Valentine’s day, and we never know how our simple acts of care and kindness will live on.


Carob Berry Tarts
Ingredients
- 1/2 Pound Strawberries (or any berry of your choice)
- 3 tbsp Coconut cream
- 2 tsp Honey
- 1/4 tsp Vanilla extract
- 10-12 Dates
- 1 Cup Coconut flakes
- 2 tbsp Carob powder
Instructions
- Preheat oven to 375 degrees F.
- In a blender or food processor, combine strawberries, coconut cream, honey, and vanilla until smooth. Place in refrigerator.
- Combine dates, coconut flakes, and carob powder in a blender or food processor. After a few minutes, the texture should be well ground and sticky.
- In a prepared muffin pan, spoon 2 tablespoons of the date mixture into each well (or 1 tablespoon if using a small pan). Place in oven and bake for 10-15 minutes.
- When finished baking, remove the muffin pan from the oven and allow it to completely cool (30 minutes to an hour). Pop the tarts out of the wells of the pan, and spread berry mix on top of them. If the spread is still runny, place in the fridge for another 30 minutes.
Originally posted February 2021
]]>Valentine’s Day is a relatively minor holiday, but it’s one I look forward to every year. February is generally my least favorite month, and Valentine’s Day adds a little happiness to hold us over until the arrival of spring. Not to mention, celebrating love is fun, and now that I have kids I’m particularly eager to make it special. Every year I put little heart-shaped notes on their doors each night for the first two weeks of February. While it’s a simple gesture on my part, the kids love waking up to a new note in the morning, and express great disappointment when I inevitably forget a day. I love how the traditions of Valentine’s Day prove that it’s the simple things we do for one another that have the biggest impact.
But let’s talk about what we really love about Valentine’s Day: Chocolate.
Spare me the diamonds. The cards are nice. Flowers I love. But what I’m really eyeing this time of year is a box of candy. Preferably big ones that I’m not expected to share. I think kids 100% agree with me on this, though I don’t want to dwell on what this says about my level of maturity. So we also make yummy treats to enjoy throughout the month of February. Usually, we’re decorating sugar cookies in the shapes of hearts, X’s&O’s, and flowers. Other times we’re in the kitchen dying different desserts pink, red, and white.
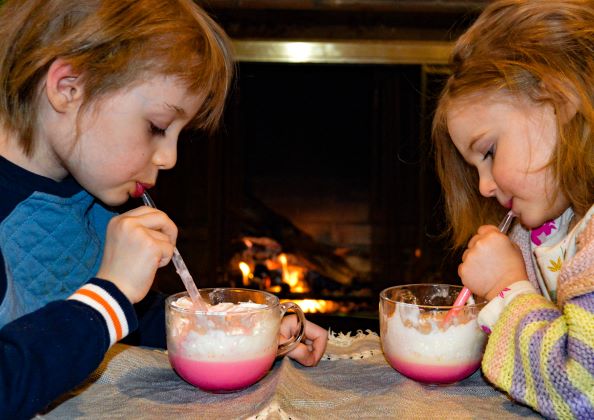
Today we enjoyed a “hot love potion” beside a cozy fire. My daughter went bonkers at the sight of pink hot chocolate, and it amazed my son to discover strawberry milk exists.
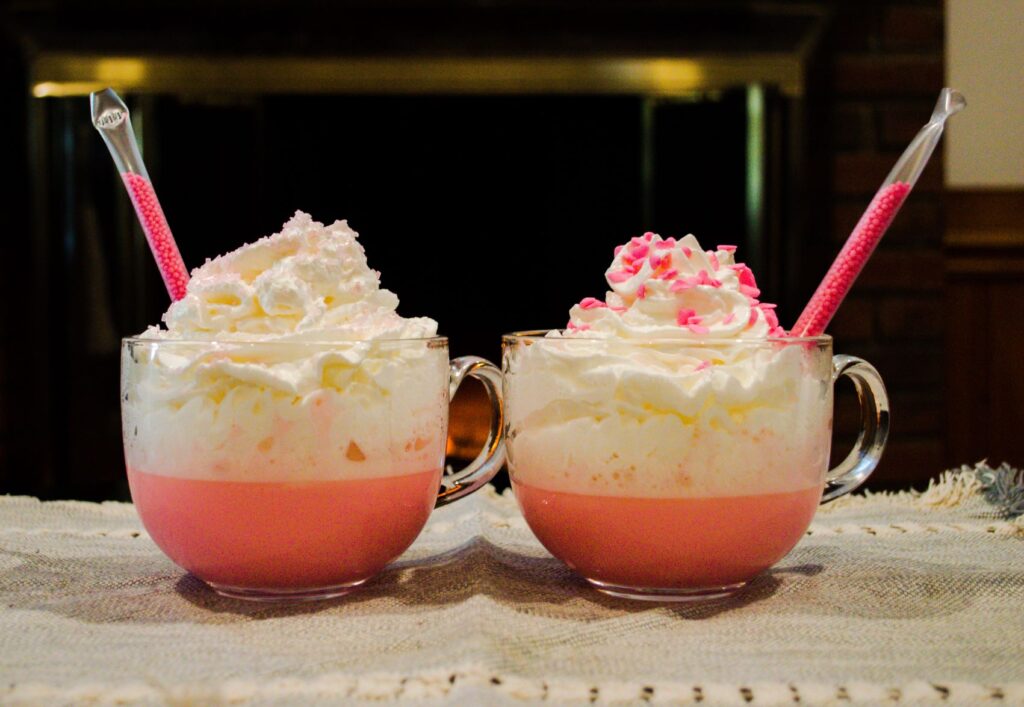
White chocolate and strawberry milk may not be everyone’s favorite flavors (especially combined), but this concoction actually turned out pretty well. In fact, I rather enjoyed it!
More importantly, the kids guzzled it down and loved it. This is definitely a recipe for those with a child-like sweet tooth, or grownups looking to impress that special little person in their life.
I mean really. Pink hot chocolate is fascinating.

Hot Love Potion
Ingredients
- 1/2 Cup White chocolate chips
- 1/4 Cup water
- 4 Cups Strawberry milk
- 3 tsp Sugar
- 1 tsp Vanilla extract
- Red food coloring (optional)
- Whipped cream
- Valentine's themed sprinkles
Instructions
- Add chocolate, water, and sugar to a small saucepan. Melt over medium-high heat, stirring consistently until the chocolate is melted and the contents are well combined.
- Add strawberry milk and vanilla to the saucepan. Bring to a boil and remove from heat immediately.
- For a bolder color, stir in food coloring. Pour into mugs, top with whipped cream and sprinkles.
Originally posted February 2021
]]>Vacations are fun, but sometimes our trips have reasons outside of leisure, or we don’t fully intend to disconnect from responsibilities while out of town (digital nomading has been a topic of conversation recently…).
Homeschooling allows us the ability to take education with us. While we’re not necessarily making the kids do schoolwork at Disney World or while on a cruise, I have in the past loaded up our books and dragged them across many states to visit family.
On a regular school day in the comfort of our home, we have a school room organized with supplies and materials we use on both a regular and not-so-regular basis. Everything we need is right there! Taking our school work on the road, however, requires preparation beyond the planning I normally do on Sunday nights. I inventory all our workbooks, I print out any worksheets we may need while away, and I have to pay extra attention to any lessons or activities that might require materials we need to pack. It’s frustrating when I forget common materials after stressing over the packing list!
In the past, I’ve shoved books into tote bags that barely held everything we needed. It was messy, I felt frazzled, and schoolwork took extra long as we sorted through papers and books trying to make do with what we remembered to bring. I’ve worked hard to create an efficient system in our home, and as I look forward to the many adventures ahead of our family I want the same sense of ease while taking our schoolwork elsewhere.
I wanted to make a portable classroom!
The idea is a simple and easy investment. We needed a large sturdy bag to hold our books, and a stash of school supplies packed away specifically for the situations where our homeschooling takes place outside of the house. We keep these supplies in the bag so pre-trip organizing is as simple as grab and go! This works for those long-distance trips across the country (or world!) as well as the occasional excursion down the street to a park when we want to take homeschooling outside for a different change of pace.
It is an incredibly easy setup:
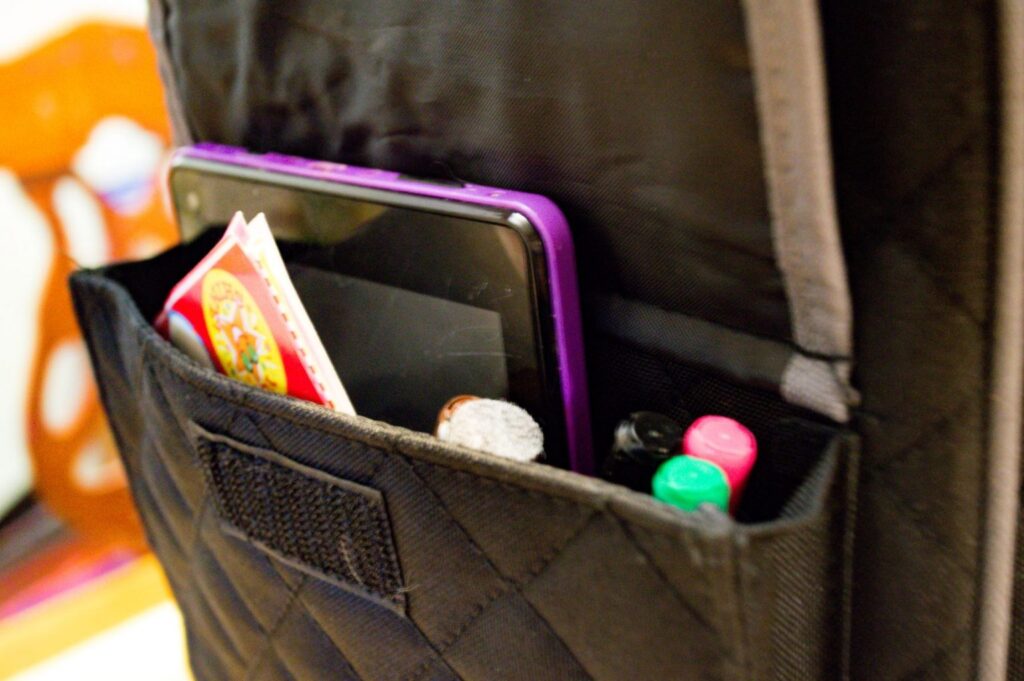
Sewing Machine Bag: Going to homeschool conferences you see many mommas pulling along those
foldable crates on wheels that carry a bunch of books and supplies. I considered those, as well as small suitcases or wheely backpacks. In the end, I decided a sewing machine case worked the best for us. It’s large and sturdy enough to hold sewing supplies, which means it should have no problem carrying my classroom. It has wheels, making it easy to transport, and many pockets for organized efficiency.
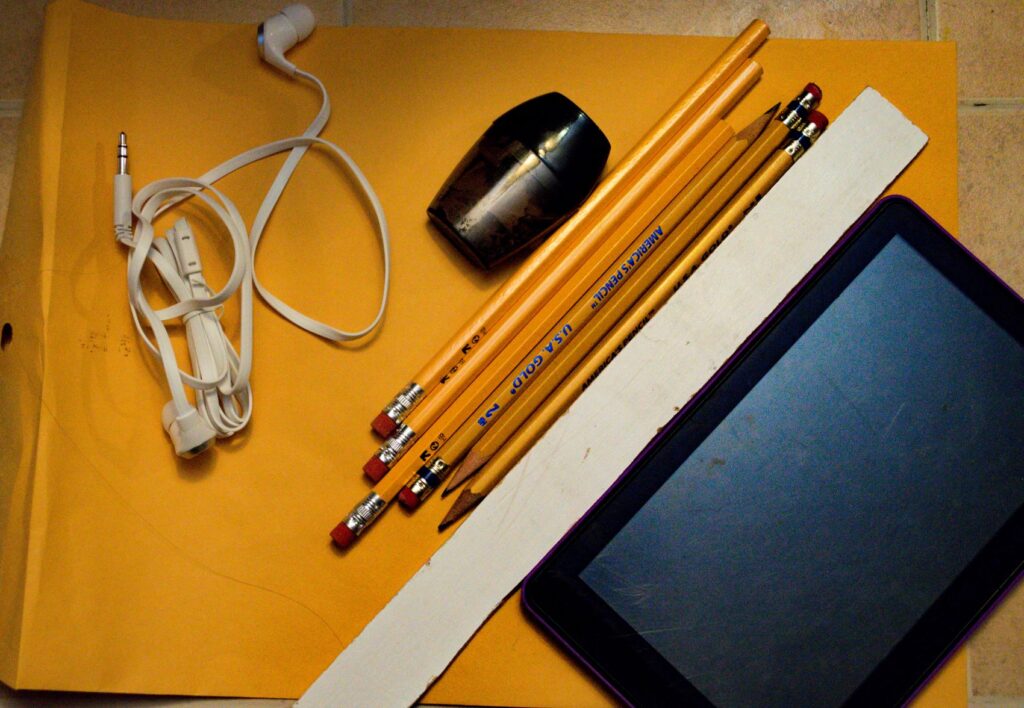
White Board: We use the whiteboard a lot. At home, we have a large one hanging on our wall, but for the purpose of travel, we have a small 11X14 inch board that easily fits in the front pocket of our bag.
Dry Erase Markers and eraser
Clip Boards: One for each child. More often than not we have a table open for our workspace. However, that is not always the case so the kiddos each have a clipboard as a surface to write on.
Notebooks: We keep both a primary journal in there to assist with handwriting, as well as a general spiral notebook for extra paper.
Crayons and Colored Pencils
Pencils
Pencil Sharpener
Ruler
Glue Stick
School Scissors
Activities Books: Activity and coloring books are great to hold one child over while I’m working with the other one.
Folder or Large Envelope: At home, my kids have portfolios for some of their work (creative writing for my son, for example). Rather than haul all of those binders along, I keep one large envelope or folder on hand to hold loose sheets of paper that I will sort when we arrive back home.
Pad, Headphones, and Charger: Not only do we use computer programs such as ABC Mouse and digital lessons offered through our curriculums, but I’ve also found that many manipulative materials we play with on a regular basis have free apps. Rather than lugging the box of math blocks along with us, or the letter tiles we use for our reading and spelling programs, I use the digital alternative for when we are not physically in our normal “classroom”. To spare us the headache, I also keep headphones and a charger in there.
Stickers: My kids are highly motivated by stickers. Scented stickers are our favorites! Whatever small reward motivates the kids, keep a small stash in a side pocket.
My portable classroom may not completely eliminate the need for pre-planning. Before heading out I still need to round up the work and textbooks, as well as print any worksheets we will need. However, having a decent bag pre-packed with basic supplies ensures I have the essentials all ready to go when it’s time to head out.
When you homeschool, the world is a classroom. This is my way of making sure I take advantage of that.
Originally posted January 2021
]]>September is here!
Is it technically fall yet? No.
Am I done with summer? Yes.
I’m not one of those fall fanatics that try redefining August as something other than summer. However, September 1st is practically a holiday in my world and no calendar technicality can convince me otherwise. By my definition..we’re in a new season!
It’s been a week and I’ve already pulled out the decorations, lit the scented candles, bought a pair of corduroy pants, ordered supplies for seasonal crafts, and my kitchen is starting to produce some classic fall flavors (last night was butternut squash soup!). My house is deliciously autumn at the moment and it will only get better as the season continues.

This morning I did the ultimate fall breakfast: Pumpkin pancakes with a spiced maple drizzle!
It was a fantastic way to begin the morning! Normally on school days, my kids stick with the boring non-sugary stuff like grainy cereals, cream of wheat, or hard-boiled eggs with toast, so they welcomed this sweet surprise with open smiling mouths.
I especially enjoyed making these with my son, who had the chance to help me from beginning to end without interruption while his sister slept in (one child is the early riser while the other is not…). It’s been a minute since we’ve had the kitchen to ourselves now that little sister enjoys cooking and baking. He’s come a long way from the simple pour and stir instructions. When did he get so big and responsible?
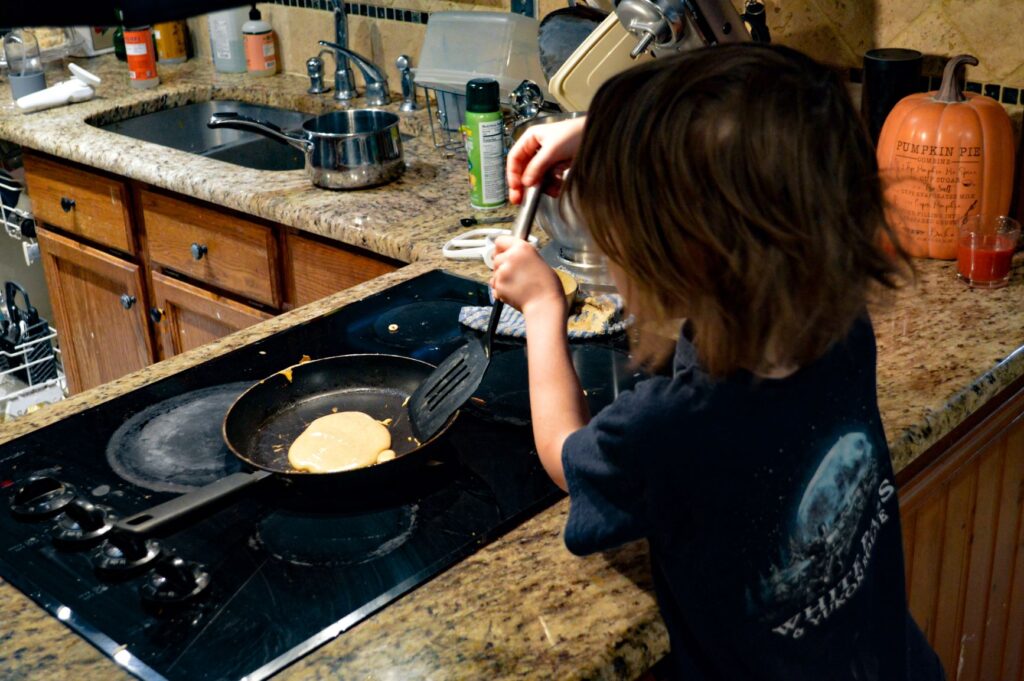
Normally little sister would throw a fit upon discovering someone cooked in the kitchen without her help, but the joy of waking up to pancakes successfully distracted her from feelings of FOMO.
The pancakes themselves tasted delicious, but the maple drizzle is really what brings the taste together. For a sweeter taste, more syrup can be added to the mix, but I was honestly surprised that the kids didn’t ask for extra.
They certainly got their fill at breakfast, and we’re looking forward to eating the leftovers tomorrow.
Happy fall! Here’s to a new season!
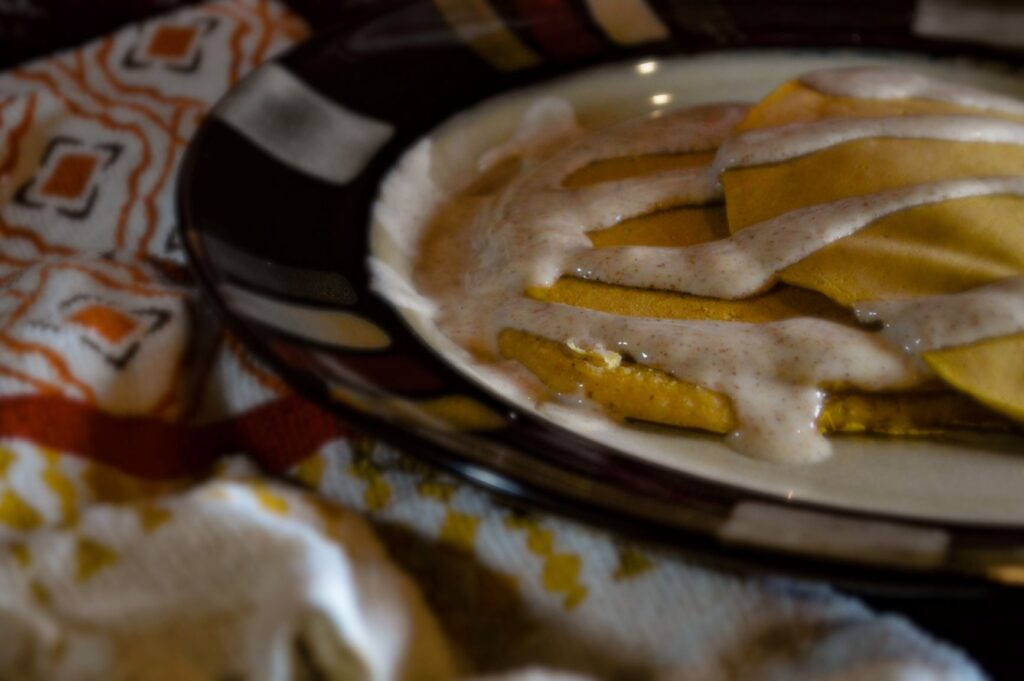
Pumpkin Pancakes with Spiced Maple Drizzle
Ingredients
Pumpkin Pancakes
- 2 Cups All-purpose flour
- 1/3 Cup Brown sugar
- 1 tsp Cinnamon
- 1/2 tsp Nutmeg
- 2 tsp Baking powder
- 1 tsp Baking soda
- 1/2 tsp Salt
- 1/2 cup Low fat Greek yogurt
- 1/2 Cup Canned pumpkin
- 1 Egg
- 1 tsp Vanilla Extract
- 1 1/2 Cups Milk
- Oil or butter for cooking
Spiced Maple Drizzle
- 1/2 Cup Low fat Greek yogurt
- Maple syrup (to taste)
- 1/4 tsp Cinnamon
Instructions
- In a large bowl or stand mixer, combine flour, sugar, cinnamon, nutmeg, baking powder, baking soda, and salt.
- In a separate bowl, mix wet ingredients. Add to the dry mixture, and whisk until smooth.
- Prepare a skillet with oil or butter and heat on ve.
- When the pan is hot, pour 1/2 cup of the batter into the middle of the pan. When the surface becomes bubbly, flip and cook for a few more seconds.
- When pancakes are finished, stir together ingredients for the spiced maple drizzle in a small bowl. Drizzle on top of pancakes and enjoy!
Originally posted September 2020
]]>It’s been a nice change! It not only takes some of the responsibility off of me, but it introduces a new dynamic of service by giving him the opportunity to make his sister’s food as well. In fact, The other day he made me a parfait after I exhaustedly flopped onto the couch post-house cleaning. It was such a sweet gesture.
So far these three ideas (along with the fruit taco we made a couple of weeks ago) have been our favorites. If you’re wanting to get your kiddo started in the kitchen, I recommend these simple but delicious snacks.
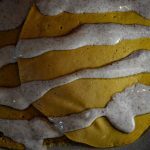
Pizza Bagel
My friend and I used to make these all the time as ravenous teenagers. Now it’s one of my go-to lunch ideas when we’re eating out of the car while road tripping. It’s simple enough for novice cooks, and if your child is ready for it they can even use the toaster to heat the bagel.
All they need to do is spread the pizza sauce (you can buy it in jars or a squeeze bottle), and top it with dried pepperoni, and mozzarella cheese.
Fruit Parfait
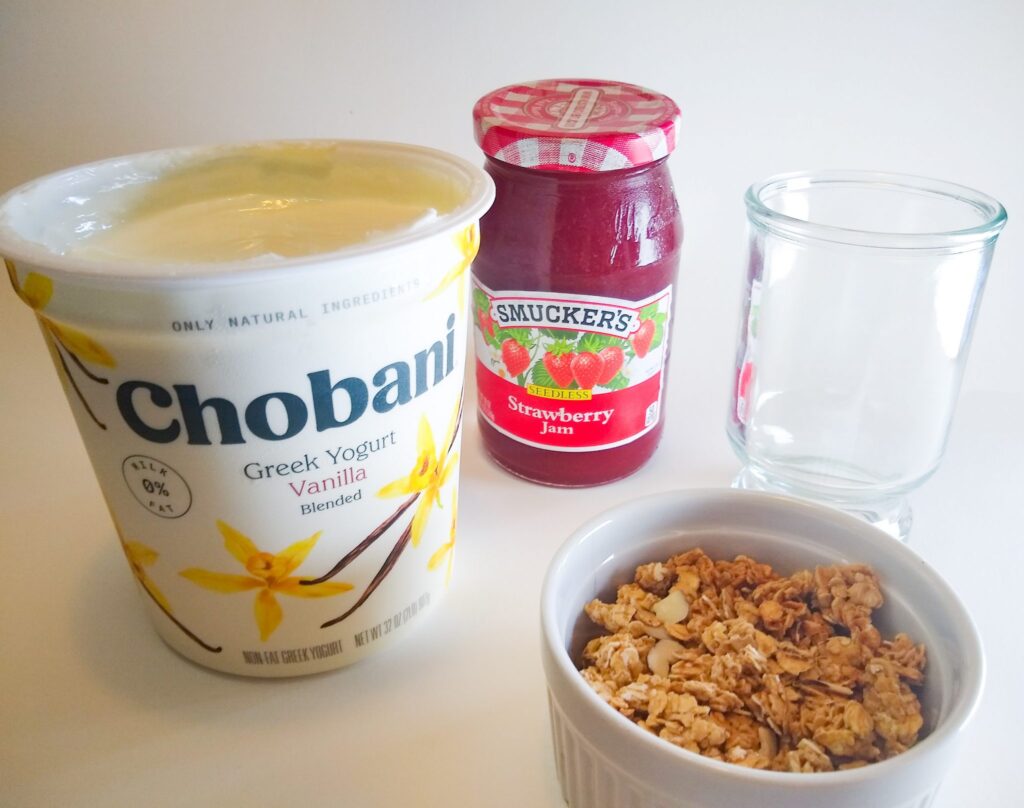
The kids loved this one! It’s a sweet treat, but yogurt is a great source of nutrition. At the bottom of a small glass, bowl, or cup layer a spread of fruit-flavored jam. The important thing when talking your kids through the instructions is to specify a particular amount of jam so as to guide them away from overloading the parfait with sugar (I told my kids to use a tablespoon). Fill the glass with vanilla yogurt, leaving about a quarter of it empty for the granola topping.
It’s delicious!
Apple Pizzas
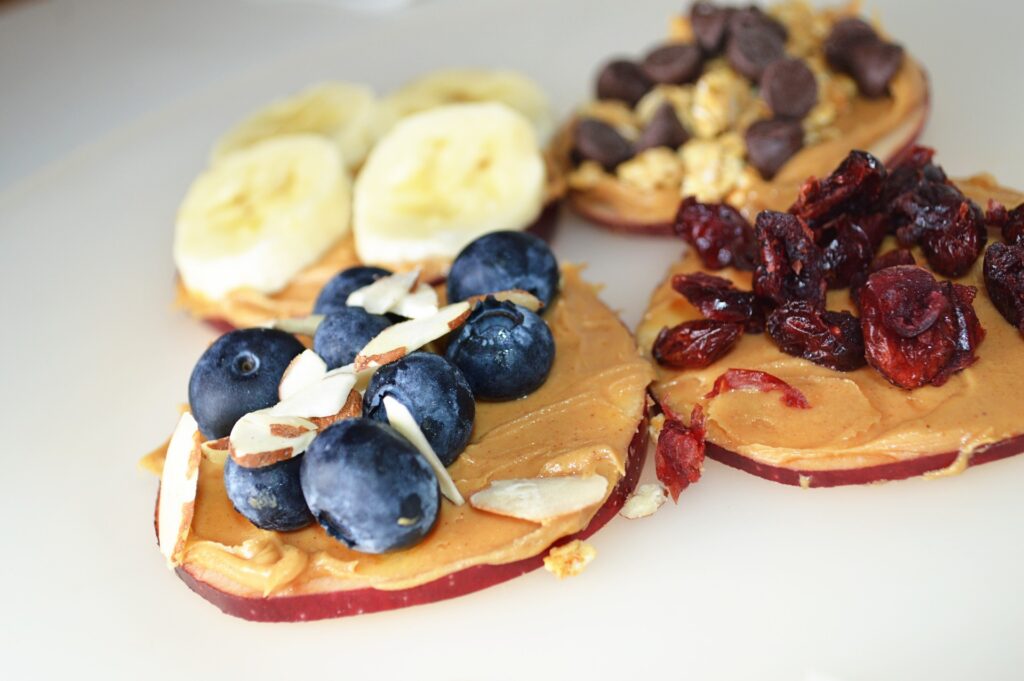
This is another sweet treat, but the variety has endless possibilities! To begin, show the kiddos how to slice up an apple. There are terrific kid-friendly knives out there that are safe for tiny and vulnerable fingers. I found mine through pampered chef, though I believe they’ve since discontinued those particular tools. You can find them in many
other places though! I highly recommend them if you want to get your kids involved in the kitchen.
On each apple slice, choose a spread as the base. We used peanut butter, but yogurt and other flavored butter are excellent choices as well. Sprinkle on embellishments such as fruits, nuts, raisins, and (if it’s a treat) chocolate chips.
Simple. Fun. And definitely yummy!

Originally posted August 2020
]]>Do you know those little packets of donuts sitting in the junk food display at grocery stores and gas stations? I can’t look at them for too long or else I’ll find myself battling temptation of biblical proportions. I know, they’re unhealthy and they’re not even especially delicious, but sometimes I just want a donut. No shame. We all have our guilty pleasures. Donuts are one of mine.
Now that we’re stuck at home thanks to COVID, donut shops are on my list of things I find myself thinking about often. The kids and I used to stop at one in particular while running errands every now and then, especially when celebrating or rewarding ourselves. Sometimes I surprised them with a donut just to be nice and fun.
I cannot wait for that element of normalcy.
Until then it feels wrong to include store-bought donuts in a grocery order. However, I feel less guilty about donuts if they’re homemade. I don’t know about you, but the rules of my kitchen dictate that if it’s homemade and from scratch, you don’t have to feel guilty about it.
To make these bad boys I suggest getting yourself a donut pan (which I find absolutely adorable!). I’ve got two of these laying around: one for full-sized donuts and another for mini-sized. The other tool I suggest using for this recipe is a piping bag, even if it’s a simple Ziploc cut at a corner. However, this isn’t totally necessary. In fact, I used a spoon since I had extra help in my kitchen at the time and didn’t feel like messing with the bag. It will, however, make filling the pan easier and less messy.
If you’re still homebound during this wild ride of a time, hopefully, these homemade donuts can offer you a little pick me up when you’re feeling the social-distancing blues. Baking is magical that way.
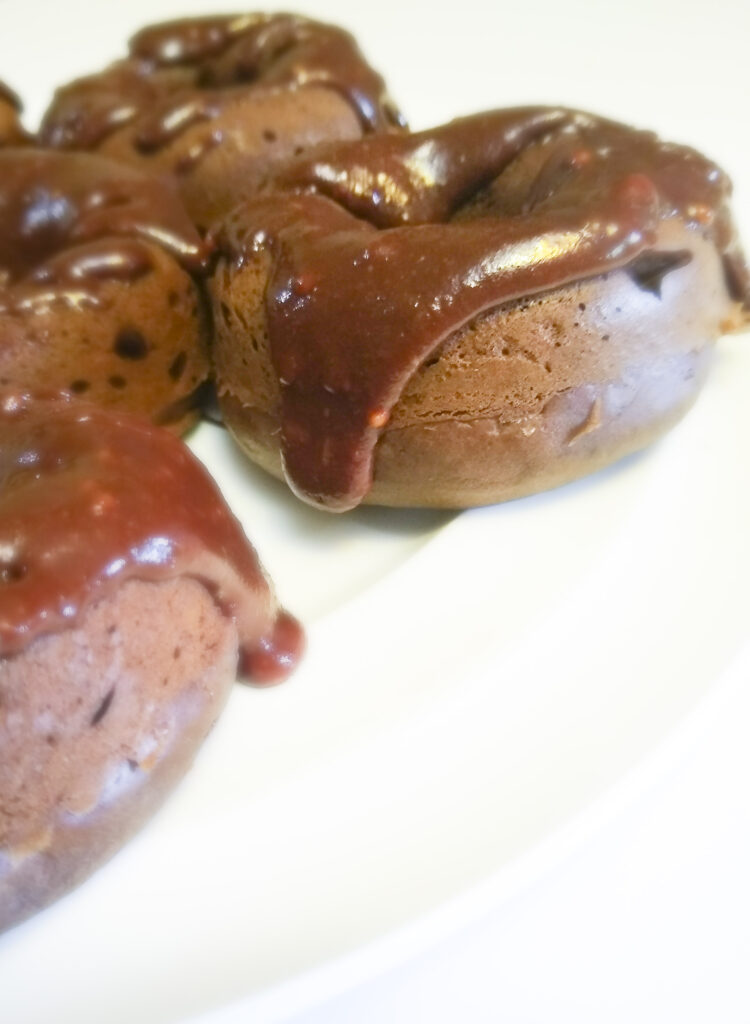

Backed Chocolate Donuts
Ingredients
Donuts
- 2 Cups All purpose flour
- 3/4 Cups Sugar
- 1/2 Cup Cocoa Powder
- 2 tsp Baking powder
- 1 tsp Baking soda
- 1 tsp Salt
- 1 cup Milk
- 2 Eggs
- 2 tbsp Melted butter
- 2 tsp Vanilla extract
Glaze
- 1 cup Semi-sweet chocolate chips
- 1/2 cup Butter
- 10 tbsp Milk
- 2 tsp Vanilla extract
- 4 cup Powdered sugar
Instructions
- Preheat oven to 350 degrees F. Grease a donut baking dish.
- In a large bowl mix eggs, sugar, vanilla extract, milk, and butter. Set this aside.
- In a small bowl mix flour, cocoa powder, baking powder, baking soda, and salt. Slowly add the dry mix into the large bowl with the wet ingredients.
- Pipe (or spoon) the batter into a donut dish. Bake for 8 minutes.
- While the donuts are baking, prepare the chocolate glaze by mixing butter, milk, vanilla extract, and chocolate chips on the stovetop until melted and well combined. Mix in the powdered sugar. Remove from heat.
- When donuts are out of the oven and cooled, spread the glaze over the top of the donuts and enjoy!
Originally posted August, 2020
]]>Once we finished our schoolwork for the morning I had to repeat this experiment just so the kids could have time playing in the suds. I gave them cups and spoons, but they definitely preferred using their bare hands. Who wouldn’t!? Admittedly this can get messy, but the good news is that clean-up is easy, especially if you follow my advice and use a sink or deep baking dish.
We took this experiment from the textbook Science in the Ancient World by Berean Builders. If you’re in the market for a homeschool science curriculum, I highly recommend this company. As exemplified by this activity, the experiments are hands-on and require simple household products you either have around the house or can easily pick up at your local store.
For this lesson, our focus was on an ancient scholar named Democritus (c. 460 BC – c. 370 BC), who is credited as one of the earliest scientists to discuss the existence of atoms. We’ve also discussed the various ways scientific theory changes over time as new evidence suggests different explanations. While Democritus helped introduce the world to atoms, not all of his theories were true. In fact, his belief that atoms are indivisible (unable to be broken into smaller parts) lasted about 2,000 years until German scientists split the uranium atom in 1938!
Democritus also believed that the difference between atoms is primarily based on shape. For example, he believed iron atoms have hooks linking them together to make them hard, salt atoms have sharp edges explaining their taste, and water atoms have a smooth surface that makes water slippery. However, we now know this isn’t true. Salt isn’t made out of salt atoms. Water is not made out of water atoms. Iron is not made out of iron atoms.
Instead, most things are made out of molecules, or a combination of atoms and ions joined together. In this experiment, we demonstrate the ability to break apart molecules to produce something different. It’s simple…
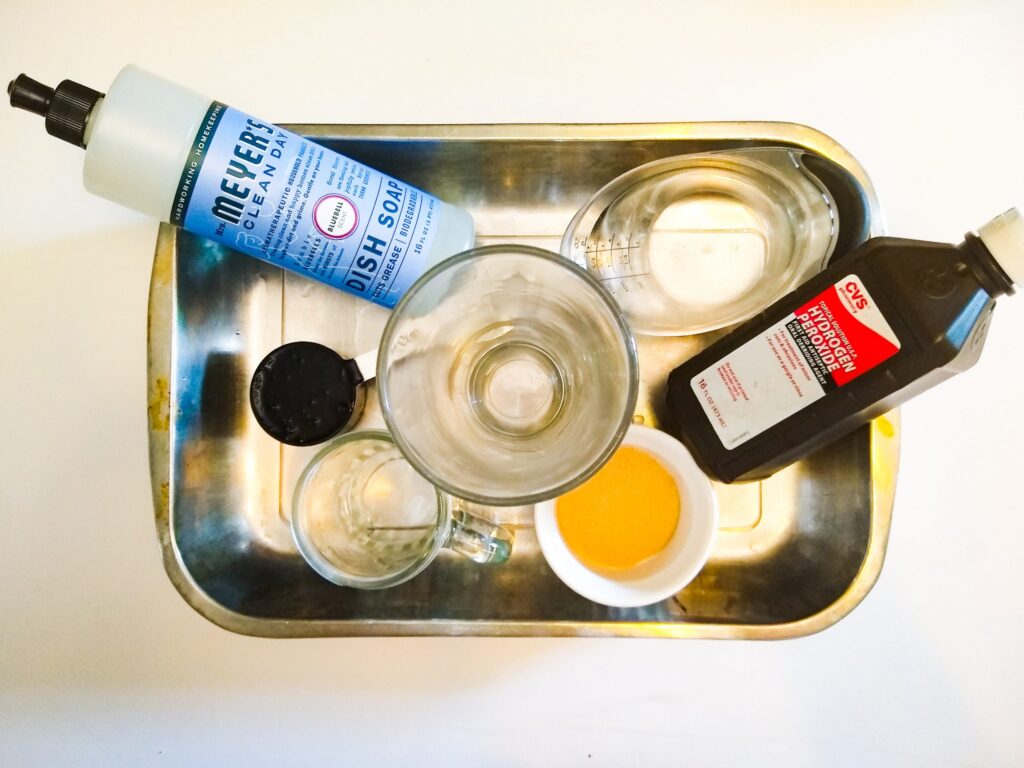
What you need
1 cup hydrogen peroxide
1 TBS active dry yeast
¼ cup dish soap
¼ cup warm tap water
Other equipment:
A tall glass
A small glass
An empty sink or a deep baking dish to control the mess.
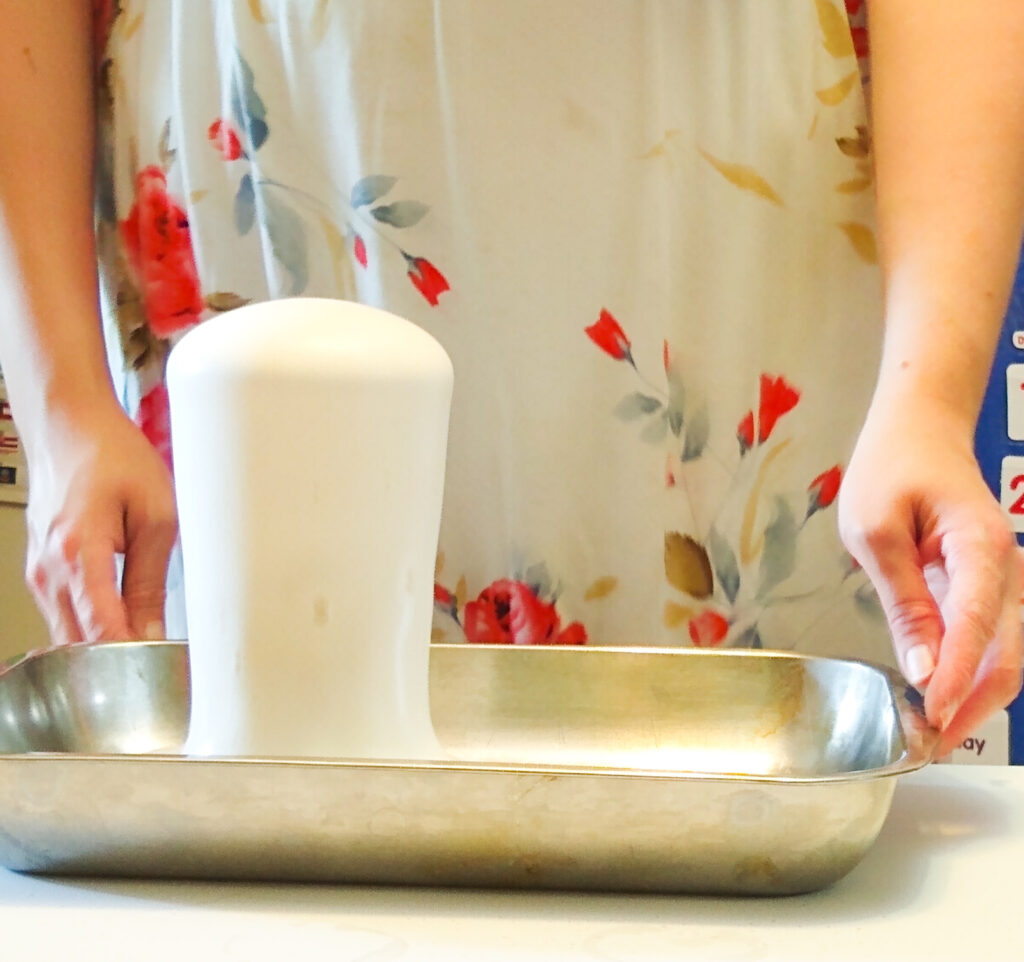
Directions
- In a small glass, combine yeast and warm water. Stir with a spoon and let it sit for roughly 2 minutes.
- Pour hydrogen peroxide into the taller class, followed by the dish soap. Swirl the glass so the two liquids mix (do not use the same spoon you used for the water and yeast).
- Place the tall glass in an empty sink or the middle of a deep baking dish. After allowing the yeast mix to sit for a couple of minutes, slowly pour the contents of the small glass into the tall glass containing hydrogen peroxide and dish soap.
Watch what happens…
You just witnessed decomposition! To put it simply, we watched as something broke down into smaller things.
Hydrogen peroxide is made up of molecules containing 2 hydrogen and 2 oxygen atoms. Being an unstable arrangement, the hydrogen molecules try to get rid of the oxygen molecules. This is why we store hydrogen peroxide in closed and dark containers. Light and air speed this process along, which will eventually leave you with…water.
Yeast contains a chemical (catalase) that also accelerates decomposition. So when we mixed the dissolved yeast with the hydrogen peroxide, the hydrogen peroxide molecules released their oxygen atoms. Oxygen, being a gas, escaped into the soap and created the foam we used to visually see this process take place.
Neat huh? The kids certainly thought so. We will revisit this lesson in later years when we’re ready to dive into a deeper understanding of atomic and molecular science. For now, it was a fun way to introduce the concept.
*As a side note, I am not affiliated with Berean Builders, nor was this a promotional post beyond my personal experience and recommendation
Originally posted July, 2020
]]>